SSH into VPS Virtual Machine on Windows Using PuTTY
How to SSH into VirtualBox VM For Virtual Private Server Testing
This article discusses setting up a virtual machine (VM) as a virtual private server (VPS) and accessing it using secure shell (SSH). This VM VPS can then be used to test configuration and software changes before deployment to a live VPS. A deployed VPS can usually be accessed using SSH, therefore using SSH into VPS running on a VM is good practice for a live situation. This test configuration should accurately reflect the live VPS, reducing mistakes when moving from test to production. This tutorial and guide shows how to set up a VirtualBox VM and access it via the Windows SSH client PuTTY, replicating production world VPS access. (Not sure what is a VPS? See the article What is a VPS? What is a VPS Used For?)
Do Not Test on Live Systems
Never test on live systems. Replicate the live system in a test environment. Use the test environment to try out new configurations and software. When happy with the changes deploy to the live system with confidence. Of course there is no guarantee that the changes to the live system will not cause problems. However, the chance of errors occurring is reduced. The test environment should be the same as the live systems so that changes have the same affect when deployed.
![]()
Using a VM is a good way to test a system without impacting a local machine. VirtualBox is a free application that can run VMs. This article uses VirtualBox to configure a VM as a test VPS. To read more about VMs and see an overview on installing VirtualBox on to a Windows machine see the article Virtualization Software for Windows, Run Another OS for Free.
Using a VM to Run a Local VPS

A VPS running in the cloud can be replicated on a local machine using a VM. The first step is to create a local VM. Then on the local VM install the same OS as the one running on the live VPS. The most common OS for a VPS is a Linux distribution. Some of the more popular Linux distributions used for a VPS include Debian, Ubunto, CentOS, Red Hat, Fedora, Gentoo and SUSE. Since a server does not need a desktop environment, also know as a graphical user interface (GUI), the minimal version of a OS is usually installed onto the VPS. In this article a minimal install of CentOS is used as the VPS OS. CentOS is based upon Red Hat which itself can be regarded as an enterprise version of Fedora. Thus CentOS is a good choice for a VPS OS. Installing CentOS to create a local VPS is covered in the article Virtual CentOS on Windows Using VirtualBox to Run the VM.
Turning On the VMs Network Card In The CentOS VPS
Unless configured during the installation of CentOS the VMs default network interface will not be configured to have networking enabled. This can be checked within the VM at the terminal. Boot the VM and log on. If you haven't configured other users the log on will be as the root user with the password selected when CentOS was installed. Once logged in enter the command ip addr (or ip addr show or simply ip a). This will show information on the default loopback interface and the VMs network interface. (The loopback is a pretend network interface used for local services, e.g. localhost, with the IP address 127.0.0.1.)
On CentOS 6:
[root@localhost ~]# ip addr
1: lo: <LOOPBACK,UP,LOWER_UP> mtu 65536 qdisc noqueue state UNKNOWN
    link/loopback 00:00:00:00:00:00 brd 00:00:00:00:00:00
    inet 127.0.0.1/8 scope host lo
    inet6 ::1/128 scope host
         valid_lft forever preferred_lft forever
2: eth0: <BROADCAST,MULTICAST> mtu 1500 qdisc noop mq state DOWN qlen 1000
    link/ether 00:22:19:09:4d:3c brd ff:ff:ff:ff:ff:ff
On CentOS 7:
[root@localhost ~]# ip addr
1: lo: <LOOPBACK,UP,LOWER_UP> mtu 65536 qdisc noqueue state UNKNOWN
    link/loopback 00:00:00:00:00:00 brd 00:00:00:00:00:00
    inet 127.0.0.1/8 scope host lo
        valid_lft forever preferred_lft forever
    inet6 ::1/128 scope host
         valid_lft forever preferred_lft forever
2: enp0s3: <BROADCAST,MULTICAST,UP,LOWER_UP> mtu 1500 qdisc pfifo_fast state UP qlen 1000
    link/ether 00:22:19:09:4d:3c brd ff:ff:ff:ff:ff:ff
The VM network card is present, and has been detected by CentOS (eth0 or enp0s3), but has not been assigned an IP address (no inet setting). Doing a dir or ls on /etc/sysconfig/network-scripts shows the presence of ifcfg-eth0 (CentOS 6) or ifcfg-eth0. A similarly named file is present in CentOS for each network card detected. List these files with the cat command:
On CentOS 6:
[root@localhost ~]# cat /etc/sysconfig/network-scripts/ifcfg-eth0
DEVICE=eth0
HWADDR=00:22:19:09:4d:3c
TYPE=Ethernet
UUID=3f5c53b3-14b4-4ef4-91ef-12137733502f
ONBOOT=no
NM_CONTROLLED=yes
BOOTPROTO=dhcp
On CentOS 7:
[root@localhost ~]# cat /etc/sysconfig/network-scripts/ifcfg-enp0s3
TYPE=Ethernet
BOOTPROTO=dhcp
DEFROUTE=yes
PEERDNS=yes
PEERROUTES=yes
IPV4_FAILURE_FATAL=no
IPV6INIT=yes
IPV6_AUTOCONF=yes
IPV6_PEERDNS=yes
IPV6_PEERROUTES=yes
IPV6_FAILURE_FATAL=no
NAME=enp0s3
HWADDR=00:22:19:09:4d:3c
UUID=b0b0d51e-77a1-46a8-8ca7-642832cda9c8
DEVICE=enp0s3
ONBOOT=no
The important line here is ONBOOT. Which is set to no. This must be changed to yes to enable the network card in the VPS.
Setting ONBOOT to yes with Vi in CentOS 6
Open ifcfg-eth0 with vi.
[root@localhost ~]# vi /etc/sysconfig/network-scripts/ifcfg-eth0Move the cursor to the no on the ONBOOT=no line, press i to enter insert mode. Change the no to yes. Press the Escape key and then :wq to write the changes and quit.
Either restart networking:
[root@localhost ~]# service network restart
Shutting down interface eth0:                   [  OK  ]
Shutting down loopback interface:               [  OK  ]
Bringing up loopback interface:                 [  OK  ]
Bringing up interface eth0:                     [  OK  ]
Determining IP information for eth0... done.    [  OK  ]
Or reboot CentOS with:
[root@localhost ~]# shutdown -r nowThe command /etc/init.d/network restart does the same.
CentOS 7 Network Manager Text User Interface (nmtui)
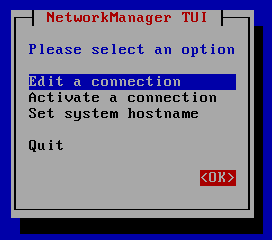
On CentOS 7 use the nmtui utility to enable the Ethernet connection on boot:
[root@localhost ~]# nmtuiSelect Edit a connection:
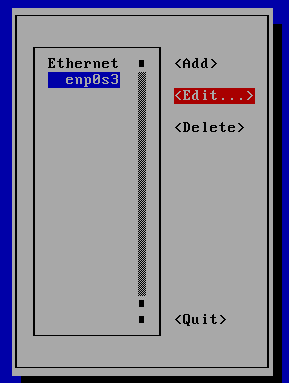
Choose the connection:
Enable Automatically connect:
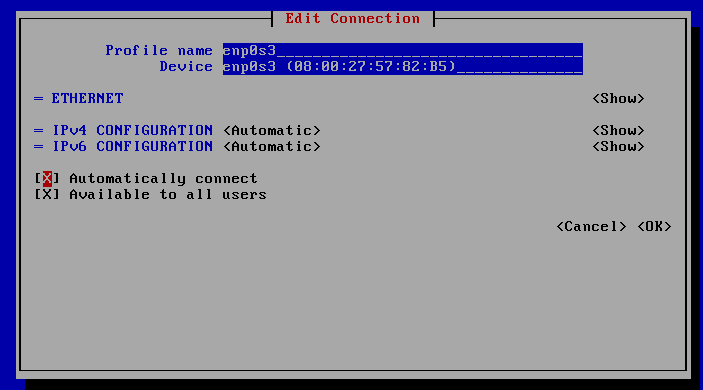
Restart the network service or reboot CentOS 7 as for CentOS 6 (service network restart or shutdown -r now).
View the VMs IP Address
Listing the configuration files as before (e.g. cat /etc/sysconfig/network-scripts/ifcfg-eth0 or cat /etc/sysconfig/network-scripts/ifcfg-enp0s3) will show ONBOOT=yes. The ip addr command will show the IP address (inet) assigned by VirtualBox, usually 10.0.2.15 (or similar). This IP address is internal to VirtualBox and is not visible to the real machines network. Yet communication to the VM VPS over TCP/IP is required to fully replicate a live set up.
If the virtual network interface is not visible how is the VM accessed over a network connection? There are few ways to do it, however, one of the easiest is port fowarding.
Use Port Forwarding for the Test VPS Networking
The default CentOS install will listen on port 22 for SSH, see a list of TCP and UDP port numbers in Wikipedia. VirtualBox can be configured to listen to a port on the host machine and forward any traffic for that port to a port on the VM. This is configured in the VM's network settings.
To change the network settings the VM VPS must be powered off or suspended. Use shutdown -h now on the CentOS terminal, or save the machine state with the VirtualBox VM window's File then Close menu option.
With the VM highlighted in the VirtualBox Manager click the Settings icon or use the Machine menu and select Settings.
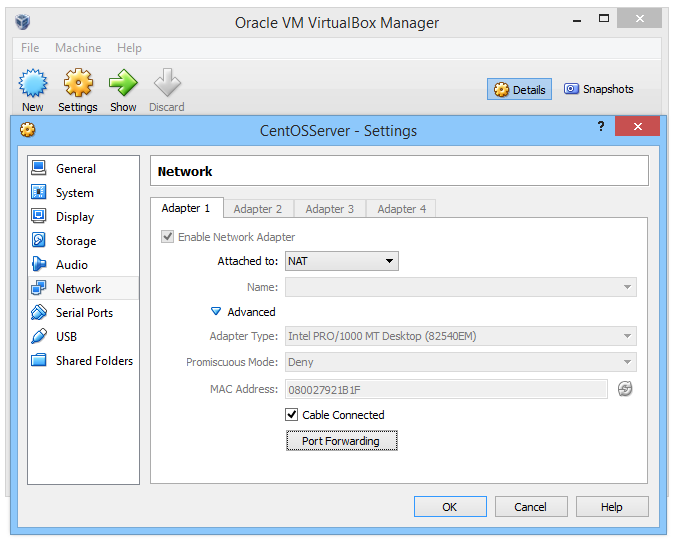
Under Network the Adapter 1 tab is selected, the default virtual network adapter enabled for the VM VPS. Click Advanced then click the Port Forwarding button On the Port Forwarding Rules dialog click the Adds new port forwarding rule icon. Give the new rule a name, e.g. ssh rule, the protocol will be TCP, Host IP address is blank. Choose a Host Port such as 2222, Guest IP is blank and Guest Port will be 22. Click OK to create the new rule.
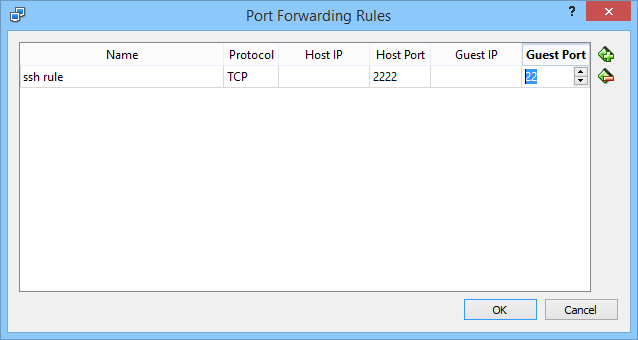
Leaving the IP addresses blank means that if the host or guest IPs change then rule will still work. The host port should not be in use by another application or service (see the the Wikipedia list for common uses of ports). While 2222 is used by some products it is easy to remember as it is simply the default port 22 written twice. Use any valid port number in the range 1025 to 65535. Use the Windows command netstat -aon to view the ports in use by the host machine (the port numbers being used appear after the colon in the list of assigned IP addresses). The Guest Port is the default SSH port of 22.
Install the PuTTY Terminal Emulator
The application PuTTY is a free terminal emulation program for Windows, it implements Telnet, SSH and other network protocols. PuTTY can be used for remote connections to Unix type machines, such as a Linux based VPS. There are various options for installing PuTTY. The easiest way is to use the PuTTY Windows installer called putty-x.yy-installer.exe, where x.yy is the version number, e.g. 0.65. Download the installer from the official PuTTY Download Page. Run the PuTTY installer, accepting any Windows security message only if the installer was obtained from the official web site. Click Next on the install dialogs. The default settings should work fine, though the install location can be changed if required. It may be worthwhile selecting the option to create a Desktop icon so that the program is easily accessible. Click the final Install button and PuTTY will be installed ready to run.
Using PuTTY to SSH into VPS Running on a VM
Open PuTTY, start a new session, the Hostname is localhost (your machine), which is the same as entering 127.0.0.1. The port is 2222, or whichever port number was set up in the port forwarding rule. Click the Open button.
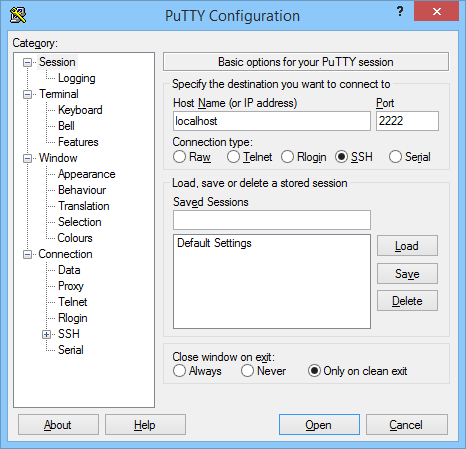
The first time PuTTY connects to the VPS a security alert is shown. Confirm that the VPS is the valid by selecting Yes (it is running on the VM on the localhost). By selecting Yes the alert will not appear next time. A terminal window will appear and if everything is configured correctly the login prompt will be available. Log in as root with the password set during install. Run a command such as ls to list the files in the directory, or yum list installed to see a list of the server's installed packages.
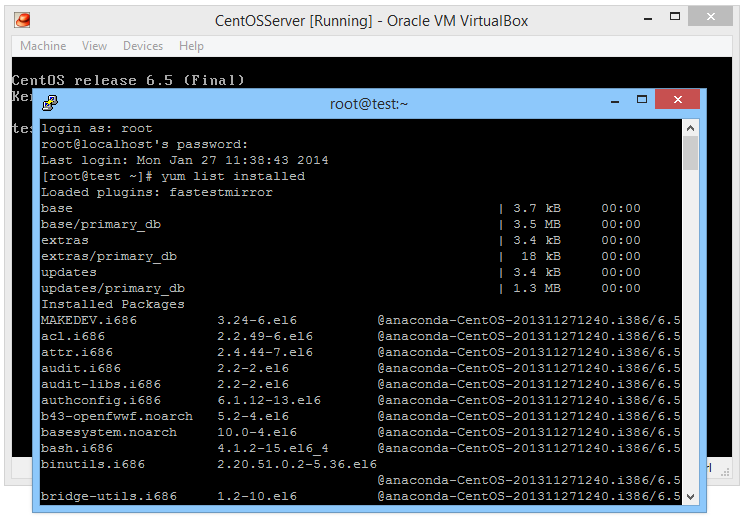
Typing logout will end the session and close the PuTTY window.
SSH into VPS Summary
This tutorial has shown how to configure a SSH connection to a virtual machine running as a VPS. The terminal emulator PuTTY is used to handle the connection session. The steps required are:
- Create a new VM in VirtualBox.
- Install a VPS, for example CentOS minimal.
- If not enabled turn on the server's network card.
- Set up Port Forwarding in the VM.
- Install PuTTY.
- Run PuTTY and connect to the VM VPS.
For more information on VirtualBox networking see the networking section in the VirtualBox on line manual.
See Also
- For a full list of the articles on Tek Eye see the full site Index
Author:Daniel S. Fowler Published: Updated:


