Animated Images in Android
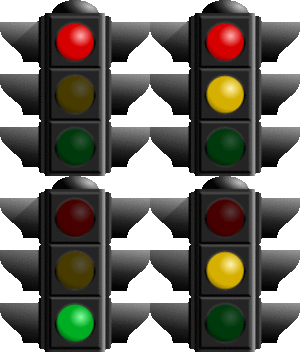
Android supports user interface animation. Views can be animated and it is easy to sequence images using the AnimationDrawable class. This article will show a simple animation for Android using a sequence of traffic light images.
(This tutorial assumes that an app can be created and run in Android Studio. If not familiar with app programming in Studio then Tek Eye has beginners articles.)

Create the Animation Frames
The first step is to generate the required images to be sequenced. Each image represents one frame of the animation, they will usually be the same size with changes between each frame as required. Here the images are generated using the open source (i.e. free) vector graphics program Inkscape. Other graphics packages can be used to generate such images. Download the image. The Traffic Lights Turned Off image used is also is available from the Open Clip Art Library. Open the file in Inkscape.
Four images will make up the animation, they will show the sequence of traffic lights as used in the United Kingdom: red, red and yellow, green, yellow and back to red. The Traffic Lights Turned Off SVG image has all the lights available, they are just hidden behind a translucent circle. Some simple operations are needed to generate the images for the sequence. Start by ungrouping the various elements that make up the complete image. In Inkscape click on the image and use the Object menu to select Ungroup.
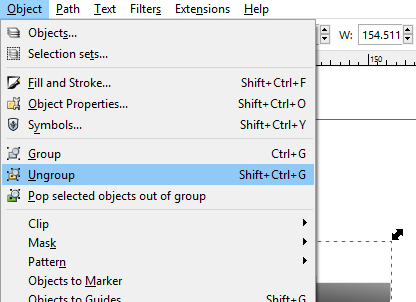
To generate the first image the circle covering the red light is deleted and the image is then exported. Since everything is selected after the ungroup operation, first click outside the image to deselect everything (or press Shift-1, i.e. !). Click the circle covering the red light. With the circle selected press Del or use the Edit menu and select Delete. Using the File menu select Export PNG Image.... In the Export PNG Image dialog under Image size enter 150 in the Height box, choose a directory and file name for the file to be generated (use the Export As if you need to select a directory), e.g. red.png. Ensure that Drawing is the selected export option. Click the Export button to export the bitmap.
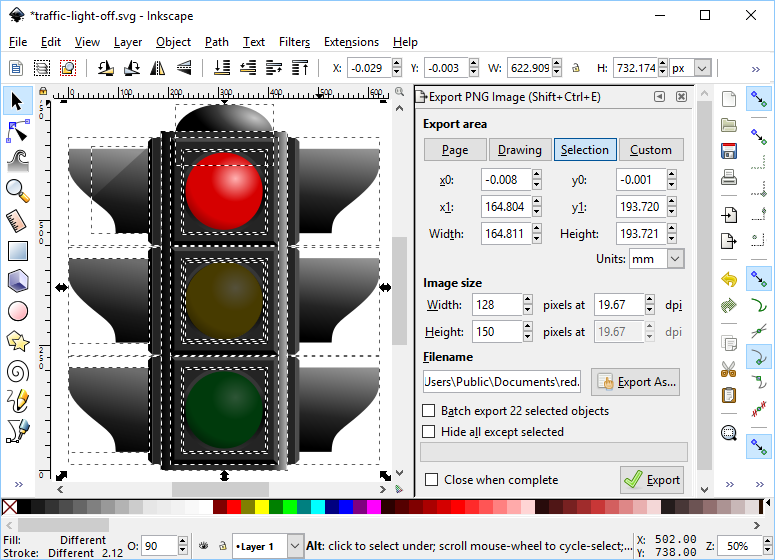
Delete the circle covering the yellow light (again click away from the image to remove any selection boxes, click the circle covering the yellow light and press Delete). Export as before to a file, e.g. red_yellow.png. Use the Edit menu and choose Undo, twice, restoring the dark circle covering the red light and yellow light. Now delete the circle covering the green light using similar steps. Export to green.png. Again use undo to cover the green light then delete the circle covering the yellow light. Export the bitmap in the same way as before to yellow.png.

Create the Animation App
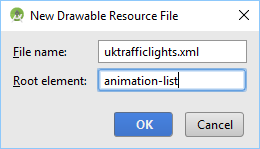
Four files are now ready for the animation. Create a new Android project in Studio, here the app is called Lights. Copy the four generated files into the res/drawable project directory (drag and drop onto drawable in Studio or copy outside of Studio). With the four image files added to the project an animation-list needs to be defined, also in the res/drawable directory. With the directory highlighted in the Project Explorer use the File menu (or context menu, usually right-click), select New then Drawable resource file. Set the File name as uktrafficlights.xml and set animation-list as the Root element, click OK.
Replace the contents of the new file with the following (see Copying Code from the Articles if required):
<?xml version="1.0" encoding="utf-8"?>
<animation-list xmlns:android="http://schemas.android.com/apk/res/android" android:oneshot="false">
    <item android:drawable="@drawable/red" android:duration="2000"/>
    <item android:drawable="@drawable/red_yellow" android:duration="2000"/>
    <item android:drawable="@drawable/green" android:duration="2000"/>
    <item android:drawable="@drawable/yellow" android:duration="2000"/>
</animation-list>
This lists the images to be animated in the order of the animation and how long each one needs to be displayed (in milliseconds). If the animation needs to stop after running through the images then the attribute android:oneshot is set to true. For the layout file (here called activity_main.xml) an ImageView is dropped onto the screen from Studio's Palette. The Resources dialog appears, select uktrafficlights and then OK.
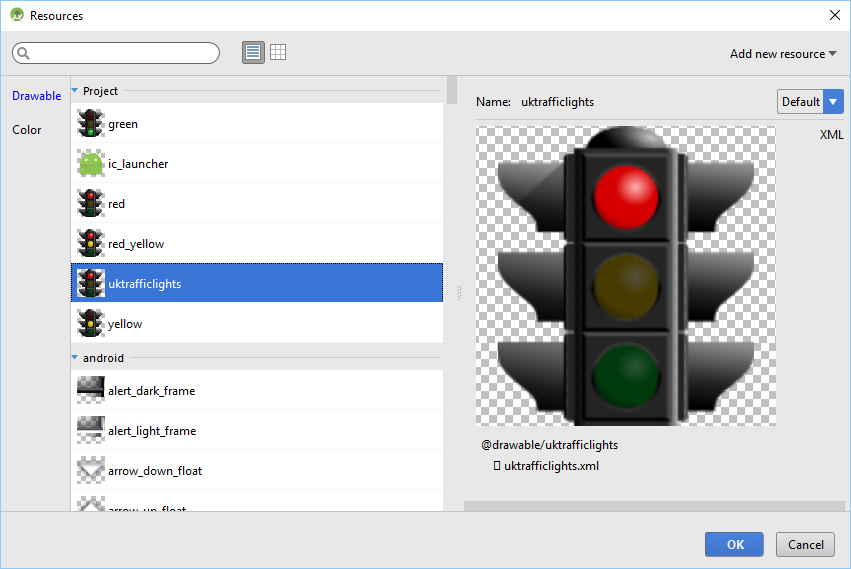
In the Properties for the ImageView the source is given as @drawable/uktrafficlights, i.e. pointing to the created file. The layout file in the res/layout folder should look similar to this:
<?xml version="1.0" encoding="utf-8"?>
<RelativeLayout xmlns:android="http://schemas.android.com/apk/res/android"
    xmlns:app="http://schemas.android.com/apk/res-auto"
    xmlns:tools="http://schemas.android.com/tools"
    android:id="@+id/activity_main"
    android:layout_width="match_parent"
    android:layout_height="match_parent"
    android:paddingBottom="@dimen/activity_vertical_margin"
    android:paddingLeft="@dimen/activity_horizontal_margin"
    android:paddingRight="@dimen/activity_horizontal_margin"
    android:paddingTop="@dimen/activity_vertical_margin"
    tools:context="com.example.lights.MainActivity">

    <TextView
        android:layout_width="wrap_content"
        android:layout_height="wrap_content"
        android:text="Hello World!"
        android:id="@+id/textView" />

    <ImageView
        android:layout_width="wrap_content"
        android:layout_height="wrap_content"
        app:srcCompat="@drawable/uktrafficlights"
        android:layout_below="@+id/textView"
        android:layout_alignParentLeft="true"
        android:layout_alignParentStart="true"
        android:layout_marginLeft="15dp"
        android:layout_marginStart="15dp"
        android:layout_marginTop="20dp"
        android:id="@+id/imageView" />
</RelativeLayout>
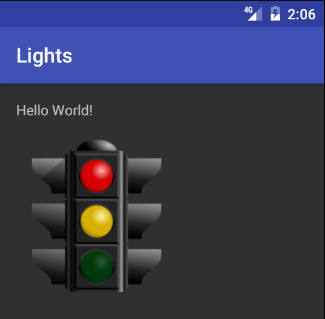
In the MainActivity class (MainActivity.java, or whatever you named it) an AnimationDrawable (the Android class that performs the animation) is declared. In onCreate() it is assigned to the drawable that the ImageView uses. Finally the animation is started by calling the AnimationDrawable start() method (there is a stop() method available to end the animation if required). The start method is called from onWindowFocusChanged(), this ensures everything has loaded before the animation starts (if could easily have been started with a Button or other type of input). When adding AnimationDrawable and ImageView code, use Alt-Enter to add the import statements when asked. The code for the Java class should be similar to this:
package com.example.lights;

import android.graphics.drawable.AnimationDrawable;
import android.support.v7.app.AppCompatActivity;
import android.os.Bundle;
import android.widget.ImageView;

public class MainActivity extends AppCompatActivity {
    AnimationDrawable lightsAnimation;
    @Override
    protected void onCreate(Bundle savedInstanceState) {
        super.onCreate(savedInstanceState);
        setContentView(R.layout.activity_main);
        ImageView lights = (ImageView) findViewById(R.id.imageView);
        lightsAnimation=(AnimationDrawable) lights.getDrawable();
    }
    public void onWindowFocusChanged(boolean hasFocus) {
        super.onWindowFocusChanged(hasFocus);
        lightsAnimation.start();
    }
}
If Stuck Try the Download
Image animations can be useful to add interest to screens and can be used in games or cartoons. Download the project source code in trafficlights.zip for this example simple animation tutorial. The project can be imported into Android Studio. The code can also be accessed via the Android Example Projects page along with other Android example projects. All the examples can be unzipped and opened in Studio using the Import project option (see instructions.txt in the zip). A version of this article was produced for the Android Cookbook.
See Also
- See the other Android example apps, projects, code and articles on Tek Eye.
- Tek Eye has more Android articles listed in the full website Index.
- After importing a project to Studio if a Rendering Problems message is displayed when viewing layouts see the article Android Studio Rendering Problems.
- If an error Minimum Supported Gradle Version is shown see the article Minimum Supported Gradle Version Error in Studio.
Archived Comments
kumudam on November 26, 2012 at 9:47 am said: Its Really Nice App:), Simply superb. Explained in a very neat manner.
Umair on November 12, 2012 at 2:39 am said: Thanks for the great article. I applied this about a month ago, but then client complained that its not working for gingerbread. Any ideas?
- Tek Eye on November 13, 2012 at 12:33 pm said: Not without seeing the source code. The code in this article is known to work on several versions of Android, including 2.3 (Gingerbread). If required you can download an APK of this code to install on a Gingerbread device from our Android Example Projects page or directly from here: lights.apk
Author:Daniel S. Fowler Published: Updated:


