Android AsyncTask Class Helps Avoid ANRs
When Android starts an application (App) it assigns it to run on a single thread process, also known as the User Interface (UI) thread. All the components in the App run on this main thread by default. The UI thread, as the name suggests, handles the interface. It posts events for the various widgets on the screen and then runs the code in the listeners for those events. If that code takes too long to execute it can cause problems for the UI. This article looks at that issue and discusses a solution with an Android AsyncTask example. (This tutorial assumes that an App can be created and run in Android Studio. If not familiar with App programming in Studio this site has beginners articles.)

Android ANR Timeout
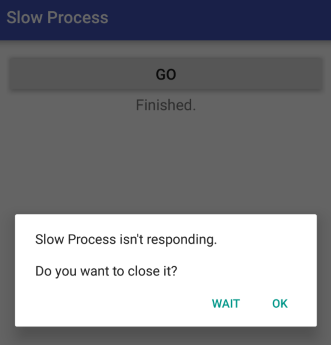
If code that is executed from a listener takes too long it will slow down event processing, including the UI events that tell widgets to redraw. The UI then becomes unresponsive. Any slow code running on the UI thread can, ultimately, result in the Application Not Responding (ANR) error. This can occur if screen elements do not get a chance to process their pending requests. This Android ANR timeout occurs after after about five seconds. When an ANR appears the user can then forcibly close the App (and then probably remove it since no one likes an App that appears to crash). The main UI thread should just be that, keeping the UI going and updated. Any heavy duty, regularly executing or potentially slow code needs to be on a background task, the Android AsyncTask class is ideal for that job. Tasks that can chew up UI thread CPU cycles included:
- Accessing large amounts of data, especially through slow connections or peripherals.
- Jittery connections when accessing networks and Internet services.
- The need to run some recurring code, for animation, polling, timing.
- Parsing large data files or XML files.
- Creating, reading, updating, deleting large database records.
- Code with too many loops.
- Intensive graphics operations.
- Game loops.
Android ANR Example
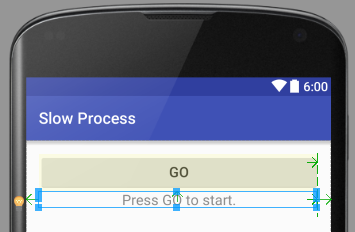
The following Android example code has an Activity with a TextView. A Button calls a method, named ThisTakesAWhile(), which mimics a slow process. The code tries to keep the UI updated on progress by updating the TextView. To use this code create a new project in Studio. In this article the App is called Slow Process and starts with an Empty Activity (the activity and layout name defaults are used). Drop a Button onto the App's layout. Move the existing TextView below the button. Make both the width of the layout. Set the button text to GO and the TextView text to Press GO to start. The text size was set to 18sp (sp for scaled pixels). The TextView id should be set to textView:

The activity_main.xml should look something like this:
<?xml version="1.0" encoding="utf-8"?>
<RelativeLayout xmlns:android="http://schemas.android.com/apk/res/android"
xmlns:tools="http://schemas.android.com/tools"
android:layout_width="match_parent"
android:layout_height="match_parent"
android:paddingBottom="@dimen/activity_vertical_margin"
android:paddingLeft="@dimen/activity_horizontal_margin"
android:paddingRight="@dimen/activity_horizontal_margin"
android:paddingTop="@dimen/activity_vertical_margin"
tools:context="com.example.slowprocess.MainActivity">

<TextView
    android:layout_width="wrap_content"
    android:layout_height="wrap_content"
    android:text="Press GO to start."
    android:id="@+id/textView"
    android:layout_below="@+id/button"
    android:layout_alignParentLeft="true"
    android:layout_alignParentStart="true"
    android:layout_alignParentRight="true"
    android:layout_alignParentEnd="true"
    android:textSize="18sp"
    android:textAlignment="center" />

<Button
    android:layout_width="wrap_content"
    android:layout_height="wrap_content"
    android:text="GO"
    android:id="@+id/button"
    android:layout_alignParentTop="true"
    android:layout_alignParentLeft="true"
    android:layout_alignParentStart="true"
    android:layout_alignRight="@+id/textView"
    android:layout_alignEnd="@+id/textView"
    android:textSize="18sp" />
In the MainActivity class file add the function to simulate a long running process. Called ThisTakesAWhile() it uses the sleep() function for one second ten times. It updates the TextView using a a reference called tv declared (TextView tv;) in the first line of MainActivity{}. Add this function before the closing brace (curly bracket). Studio will prompt to add the SystemClock import, do this with Alt-Enter:
private void ThisTakesAWhile() {
    //mimic long running code
    int count = 0;
    do{
        SystemClock.sleep(1000);
        count++;
        tv.setText("Processed " + count + " of 10.");
    } while(count<10);
}
Add the inner class for an OnClickListener. This updates the TextView, calls the long running process. Then changes the text to Finished when the process ends. Add it after the OnCreate(){...}, pressing Alt-Enter when prompted to add the View and OnClickListener (for a View) imports:
class doButtonClick implements OnClickListener {
    public void onClick(View v) {
        tv.setText("Processing, please wait.");
        ThisTakesAWhile();
        tv.setText("Finished.");
    }
}
Before the closing brace of the onCreate() use the findViewById() function to assign tv and call setOnClickListener() (to assign the ClickListener). The full code should look like this (add any missing imports, e.g. place the cursor on TextView and press Alt-Enter):
package com.example.slowprocess;

import android.os.SystemClock;
import android.support.v7.app.AppCompatActivity;
import android.os.Bundle;
import android.view.View;
import android.widget.TextView;

public class MainActivity extends AppCompatActivity {
    TextView tv; //for class wide reference to update status
    @Override
    protected void onCreate(Bundle savedInstanceState) {
        super.onCreate(savedInstanceState);
        setContentView(R.layout.activity_main);
        //get the references to on screen items
        tv=(TextView) findViewById(R.id.textView);
        //handle button presses
        findViewById(R.id.button).setOnClickListener(new doButtonClick());
    }

    class doButtonClick implements View.OnClickListener {
        public void onClick(View v) {
            tv.setText("Processing, please wait.");
            ThisTakesAWhile();
            tv.setText("Finished.");
        }
    }

    private void ThisTakesAWhile() {
        //mimic long running code
        int count = 0;
        do{
            SystemClock.sleep(1000);
            count++;
            tv.setText("Processed " + count + " of 10.");
        } while(count<10);
    }
}
When this code is run and the Button pressed the text only changes after ten seconds to Finished. The messages that are meant to provide feedback counting from 1 to 10 are never shown. This illustrates how the UI can be blocked by code executing on the main thread. In fact bash the button a few times and an ANR occurs.

The solution is to run the time consuming code away from UI events. Ideally for potentially slow operations we want to start them from the UI in a background thread, get regular reports on progress, cancel them if need be and get a result when they have finished. In Android the AsyncTask class does all of that easily without having to crank out a lot of code. With AsyncTask the time consuming code is placed into a doInBackground() method, there are onPreExecute() and onPostExecute() methods (for pre and post task work), and an onProgressUpdate() method to provide feedback. The background task can be cancelled by calling the cancel() method, causing onCancelled() to execute.
The above example is changed to demonstrate using an AsyncTask object. The count variable is moved to the main class level and a couple more module variables are added (to store the Button reference and a processing state). The button reference is set up in onCreate(). The method used to run the slow process is replaced with an AsyncTask object, also given the name ThisTakesAWhile. The button click handler uses this new object. The execute() method starts the ball rolling. The long running process can be stopped with the button if required (using the cancel() method). Here is the resulting MainActivity class with the Imports for AsyncTask and Button added:
package com.example.slowprocess;

import android.os.AsyncTask;
import android.os.SystemClock;
import android.support.v7.app.AppCompatActivity;
import android.os.Bundle;
import android.view.View;
import android.widget.Button;
import android.widget.TextView;

public class MainActivity extends AppCompatActivity {
    TextView tv;        //for class wide reference to update status
    int count;          //number of times process has run, used for feedback
    boolean processing; //defaults false, set true when the slow process starts
    Button bt;          //used to update button caption
    @Override
    protected void onCreate(Bundle savedInstanceState) {
        super.onCreate(savedInstanceState);
        setContentView(R.layout.activity_main);
        //get the references to on screen items
        tv=(TextView) findViewById(R.id.textView);
        //handle button presses
        findViewById(R.id.button).setOnClickListener(new doButtonClick());
        bt=(Button) findViewById(R.id.button);
    }

    class doButtonClick implements View.OnClickListener {
        ThisTakesAWhile ttaw;//defaults null
        public void onClick(View v) {
            if(!processing){
                ttaw = new ThisTakesAWhile();
                ttaw.execute(10);    //loop 10 times
            } else {
                ttaw.cancel(true);
            }
        }
    }

    class ThisTakesAWhile extends AsyncTask<Integer, Integer, Integer>{
        int numcycles;  //total number of times to execute process
        protected void onPreExecute(){
            //Executes in UI thread before task begins
            //Can be used to set things up in UI such as showing progress bar
            count=0;    //count number of cycles
            processing=true;
            tv.setText("Processing, please wait.");
            bt.setText("STOP");
        }
        protected Integer doInBackground(Integer... arg0) {
            //Runs in a background thread
            //Used to run code that could block the UI
            numcycles=arg0[0];  //Run arg0 times
            //Need to check isCancelled to see if cancel was called
            while(count < numcycles && !isCancelled()) {
                //wait one second (simulate a long process)
                SystemClock.sleep(1000);
                //count cycles
                count++;
                //signal to the UI (via onProgressUpdate)
                //class arg1 determines type of data sent
                publishProgress(count);
            }
            //return value sent to UI via onPostExecute
            //class arg2 determines result type sent
            return count;
        }
        protected void onProgressUpdate(Integer... arg1){
            //called when background task calls publishProgress
            //in doInBackground
            if(isCancelled()) {
                tv.setText("Cancelled! Completed " + arg1[0] + " processes.");
            } else {
                tv.setText("Processed " + arg1[0] + " of " + numcycles + ".");
            }
        }
        protected void onPostExecute(Integer result){
            //result comes from return value of doInBackground
            //runs on UI thread, not called if task cancelled
            tv.setText("Processed " + result + ", finished!");
            processing=false;
            bt.setText("GO");
        }
        protected void onCancelled() {
            //run on UI thread if task is cancelled
            processing=false;
            bt.setText("GO");
        }
    }
}
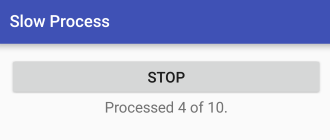
With the slow process wrapped up in the AsyncTask object the UI thread is freed from waiting and the feedback messages get displayed to tell the users what is happening.

When cancel is called the background process may not stop immediately. For example two cycles have completed and the third starts just as cancel is called. Then the third cycle could still complete. In some scenarios this process may need to be thrown away, rolled back, or handled differently. With version 3.0 of Android the AsyncTask object was extended to provide an onCancelled(Object) method, again run when cancel() is executed. This new version of onCancelled takes the same object as that returned by doInBackground(). This allows the program to determine the state of the background task when cancelled. If this newer version of AsyncTask is used onCancelled can be defined differently.
protected void onCancelled(Integer result) {
    //run on UI thread if task is cancelled
    //result comes from return value of doInBackground
    tv.setText("Cancelled called after "+ result + " processes.");
    processing=false;
    bt.setText("GO");
}
For the above scenario it would be known that cancelled was called after two processes completed even though the third then completed. Depending upon the requirements the work done by the third process could then be rolled back.
This article has shown how to move code that could potentially frustrate users and cause poor performance into the useful AsyncTask object. If required download slowprocess.zip for the project and code from this AsyncTask tutorial. Extract the zip contents and import the project into Studio.
See Also
For further details see AsyncTask on the Android Developers web site.
The source code link for this tutorial is also on the Android Example Projects page.
Archived Comments
mcwong on June 12, 2012 at 2:35 pm said: Thanks, great tutorial among so many on AsyncTask. I can understand and grasp how it is done!
Author:Daniel S. Fowler Published: Updated:


