Access Android View in Activity
When programming Android apps the code will need to reference the screen elements to show data and read user actions. The screen elements are based on the Android View class and its sub-classes. This article covers the assignment of an identifier (id) to a screen item (View), and using that id to access the item in the app code. Example Android Studio code is provided.

The User Interface (UI) for an app, i.e. the app screens, can be designed in Android Studio. The screens, or parts of screens, are stored in Layouts as Extensible Markup Language (XML) files. Different layouts can be defined for different size screens, and different modes, e.g. portrait and landscape. This allows for support of multiple screen sizes and types, and eases software maintenance. (Screens can be constructed dynamically in code, but that is not covered in this article.)
In Android Get View Defined in XML in Activity Code
UI components made from Views include the widgets (components) the a users will work with in the app. These include the Button, Checkbox, EditText (a text box), ImageView, RadioButton, ProgressBar, TextView (a label) and many more. Several such widgets sit in a ViewGroup, another type of View, which provides a container for laying out the components. Different ViewGroups provide different types of layouts, including RelativeLayout, LinearLayout, ScrollView, WebView and others, including the recent ConstraintLayout. ViewGroups can contain other ViewGroups, therefore allowing complex displays by nesting different Views. Classes in the Android Software Development Kit (SDK) have methods used to access all the different types of Views.
First Create a Basic Android Screen
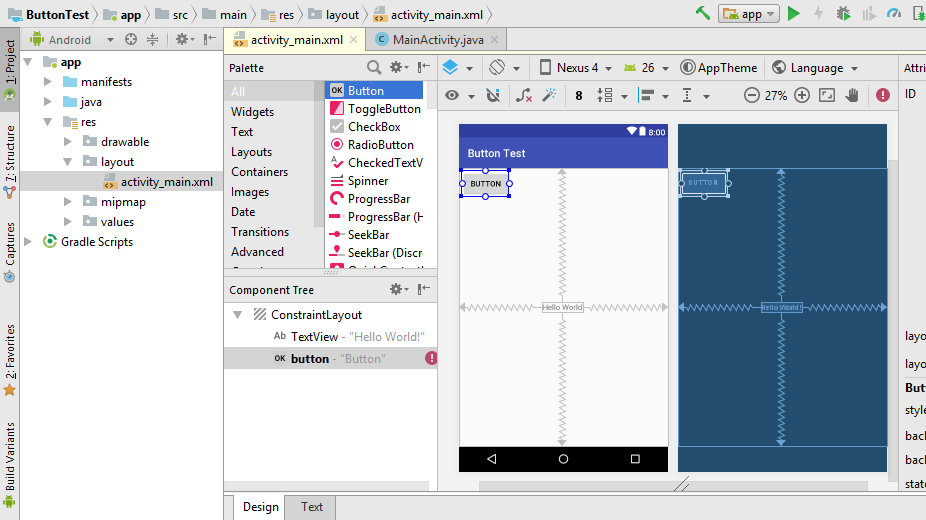
For this tutorial create a new, simple Android app project and call it Button Demo (if you don’t know how see Your First Android Hello World Java Program). A simple screen that just has a button on it was created using the starting layout, keeping the default layout name of activity_main.xml. With activity_main.xml open in the Design tab drag and drop a Button from the Palette onto the app layout screen.

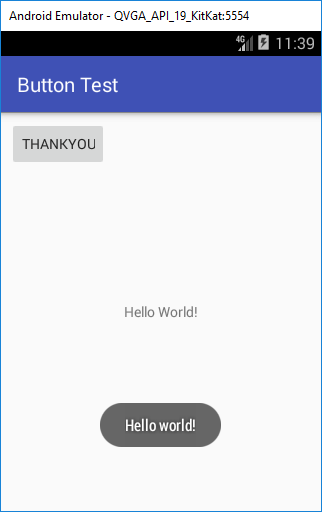
To show how this view is accessed from the app’s code the text on the Button will be changed and it displays a message when it is clicked.
An Explanation of Android’s View Ids
The important part of a screen item, when accessing it in the code, is the android:id attribute. Here it is set to button. The id attribute is edited in the Attributes list in Studio. When looking at the screen in text mode (use the Text tab at the bottom of the edit area) then the Button XML shows android:id="@+id/button". Here the plus sign (+) tells the Android SDK that it is a new id. When defining an id for a View it is in the form of @+id/name. Think of it as @ for address, the + for add new, the id for identifier, and /name for the uniqueness (it is not possible to have two Views with the same name). I.e. it is defining an id that uniquely addresses the screen element.
Having an id allows code to access that particular View. If a View does not need to be accessed it does not need an id. However, it does need an id for automatic state saving. If in doubt add an id, it usually helps with future app maintenance. It also helps to give the View a sensible id. For example a TextView showing a cell phone number could be called textCellPhone, which is better than textView24.
The build process for the Android app generates a Java public class called R for all the defined resources. The ids given to screen elements are resources, therefore they are added to the R class as integer values (the values are assigned during the build process). An id value can be accessed using R.id.name. In this example the Button id of button is used in the code with R.id.button. The id values are declared static final int, so they cannot be changed at execution time in the code. (Very occasionally the R class gets our of sync with the code. Choosing Clean Project from the Build menu often fixes it, or if it does not choose Invalidate Caches/Restart from the File menu.)
Using the View Id to Get a View Reference
When the app’s main Java class is opened (in this example using the default class name of MainActivity), it will be seen that it extends another class, the Activity class or AppCompatActivity class. This provides a method called findViewById, which takes the ids from the R class and returns a reference to the relevant View. This reference is then cast to the appropriate object, in this case a button. Therefore to get a reference to the Button use this code:
Button btn = (Button) findViewById(R.id.button);The cast to the Button class will require import android.widget.Button; adding to the imports section of the MainActivity.java file. Studio can do this automatically. With the cursor on Button a prompt appears asking to press Alt-Enter to add the import. Pressing Alt-Enter adds the relevant import automatically.
Using the Reference Returned by findViewById
With the reference returned by findViewById cast to the appropriate object the interface elements can be manipulated using their class methods. For example the text for the Button is changed using the button’s setText method:
btn.setText("Say Hello");To handle the button being pressed an instance of the OnClickListener class must be attached to the button reference, using the well named setOnClickListener method (which is provided by the View class). The implementation of OnClickListener takes an onClick function, which is called when the View’s click occurs. Here is a definition of an onClick function, being passed into the constructor of an OnClickListener implementation, it simply displays a message. Again add any required imports using Alt-Enter:
class HandleClick implements OnClickListener{
    public void onClick(View arg0) {
      Toast.makeText(getApplicationContext(), "Hello world!", Toast.LENGTH_SHORT ).show();
    }
}
Notice that the onClick function takes a View object as a parameter, here called arg0. This parameter is a reference to the pressed View. Again this can be cast to the screen element pressed, here a Button, so that the clicked item can be accessed in the onClick function:
Button btn = (Button) arg0;
btn.setText("Thankyou");
Using an Anonymous Class with findViewById
If you need to access a reference to a View only once it saves code to use an anonymous class. This is where you use the return value of findViewById but do not assign it to a declared class variable. Behind the scenes Java still creates a class but it cannot be seen, hence it is anonymous. This is done by wrapping the cast and call to findViewById in brackets and using it like it is a class itself, so this:
Button btn = (Button) findViewById(R.id.button);
btn.setText("Say Hello");
Becomes:
((Button) findViewById(R.id.button)).setText("Say Hello"); Using Module Level View References
If a View is going be accessed in several place in a Java file, then declare the View variable at the module level. The following source code is the final MainActivity.java class for this demo. Notice how the btn variable is declared at the start of the class definition. It is assigned in the onCreate method (after the call to setContentView). It is then used in the HandleClick class with out needing to cast the arg0 parameter to its own Button reference:
package com.example.buttontest;

import android.support.v7.app.AppCompatActivity;
import android.os.Bundle;
import android.view.View;
import android.widget.Button;
import android.widget.Toast;

public class MainActivity extends AppCompatActivity {
    Button btn; //stores reference to button for the whole class

    @Override
    protected void onCreate(Bundle savedInstanceState) {
        super.onCreate(savedInstanceState);
        setContentView(R.layout.activity_main);
        //get reference to button
        btn = (Button) findViewById((R.id.button));
        //change the buttons caption
        //(usually done in the XML or via a string resource)
        btn.setText("Say Hello");
        //attach the click listener
        btn.setOnClickListener(new HandleClick());
    }
    class HandleClick implements View.OnClickListener {
        public void onClick(View arg0) {
            Toast.makeText(getApplicationContext(), "Hello world!", Toast.LENGTH_SHORT ).show();
           btn.setText("Thankyou");
        }
    }
}
For completeness here is the activity_main.xml that was used:
<?xml version="1.0" encoding="utf-8"?>
<android.support.constraint.ConstraintLayout xmlns:android="http://schemas.android.com/apk/res/android"
    xmlns:app="http://schemas.android.com/apk/res-auto"
    xmlns:tools="http://schemas.android.com/tools"
    android:layout_width="match_parent"
    android:layout_height="match_parent"
    tools:context="com.example.buttontest.MainActivity">
    <TextView
        android:layout_width="wrap_content"
        android:layout_height="wrap_content"
        android:text="Hello World!"
        app:layout_constraintBottom_toBottomOf="parent"
        app:layout_constraintLeft_toLeftOf="parent"
        app:layout_constraintRight_toRightOf="parent"
        app:layout_constraintTop_toTopOf="parent" />
    <Button
        android:id="@+id/button"
        android:layout_width="wrap_content"
        android:layout_height="wrap_content"
        android:layout_marginStart="8dp"
        android:layout_marginTop="8dp"
        android:layout_marginLeft="8dp"
        android:text="Button"
        app:layout_constraintStart_toStartOf="parent"
        app:layout_constraintTop_toTopOf="parent" />
</android.support.constraint.ConstraintLayout>
Download some example code in view-id.zip from this article ready for importing into Android Studio. See the instructions in the zip file, alternatively the code can also be accessed via the Android Example Projects page.
See Also
- Different Ways to Code Android Event Listeners
- Saving Activity State in an App when it's Interrupted
- See the Android Example Projects page for lots of Android sample projects with source code.
- For a full list of all the articles in Tek Eye see the full site alphabetical Index.
Author:Daniel S. Fowler Published: Updated:


