Limit EditText Input with Attributes and the TextWatcher
App interaction with the user occurs in several ways, buttons, lists, images and more. Most Apps require the user to enter data at some point, with words or numbers, or both. The EditText can be used for data entry. Often the data needs to be restricted to a particular range or type, maybe a whole number, a decimal number, a number between two values or words that are capitalized. When defining an EditText in a layout attributes such as android:inputType can be used to constrain what the user is able to enter. This automatically reduces the amount of code required for validation because there are fewer checks needed on the input data.

The TextWatcher interface is also useful for restricting values. As the name suggests it can monitor text fields and call code when that text changes, this allows input to be checked as the user types. In the following example an EditText only allows a value between 0 and 100, for example to represent a percentage. There is no code required to check the value when the user leaves the field because it is all done as the user types. (This tutorial assumes that an App can be created and run in Android Studio. If not familiar with App programming in Studio see the free beginners articles.)
To use this code start a new Android project, in this tutorial it is called Percentage. It uses an Empty Activity with the default entries for Activity Name and Layout Name. This is a simple layout with one EditText for the screen. Delete the existing TextView and from the Palette drop a Number from Text Fields on to the activity_main.xml layout.
Using the Properties list for the EditText set text to 0 (this sets a starting value) and maxLength to 3 (to limit the input to three characters), the inputType property has already been set to number. The layout XML should be similar to this:
<?xml version="1.0" encoding="utf-8"?>
<RelativeLayout xmlns:android="http://schemas.android.com/apk/res/android"
    xmlns:tools="http://schemas.android.com/tools"
    android:layout_width="match_parent"
    android:layout_height="match_parent"
    android:paddingBottom="@dimen/activity_vertical_margin"
    android:paddingLeft="@dimen/activity_horizontal_margin"
    android:paddingRight="@dimen/activity_horizontal_margin"
    android:paddingTop="@dimen/activity_vertical_margin"
    tools:context="com.example.apackage.MainActivity">

    <EditText
        android:layout_width="wrap_content"
        android:layout_height="wrap_content"
        android:inputType="number"
        android:ems="10"
        android:id="@+id/editText"
        android:layout_alignParentLeft="true"
        android:layout_alignParentStart="true"
        android:layout_alignParentRight="true"
        android:layout_alignParentEnd="true"
        android:text="0"
        android:maxLength="3" />
</RelativeLayout>
Within the MainActivity Java class a new inner class is used to implement the TextWatcher interface. The afterTextChanged() method will be called when the text changes as the user types. In this method the value being typed is checked to see if it is greater than 100. If so it is set to 100. There is no need to check for values below zero because they cannot be entered (because of the properties). A try catch is required for when all the numbers are deleted in which case the test for values above 100 would exception (trying to parse an empty string). For TextWatcher there are beforeTextChanged() and onTextChanged() methods to implement, but they are empty in this example.
Changing the EditText value in afterTextChanged() is allowed as its internal Editable class is passed in (it cannot be changed by altering the CharSequence passed to beforeTextChanged() and onTextChanged(), see the documentation on the Android developer website. In the onCreate() for the Activity the class implementing TextWatcher is connected to the EditText using the addTextChangedListener() method. The imports for TextWatcher, Editable, EditText and Log are required, add when prompted using Alt-Enter (Log is used here for demonstration purposes only). Here is the complete code for MainActivity.java:
package com.example.apackage;

import android.support.v7.app.AppCompatActivity;
import android.os.Bundle;
import android.text.Editable;
import android.text.TextWatcher;
import android.util.Log;
import android.widget.EditText;

public class MainActivity extends AppCompatActivity {

    @Override
    protected void onCreate(Bundle savedInstanceState) {
        super.onCreate(savedInstanceState);
        setContentView(R.layout.activity_main);
        EditText percentage=(EditText) findViewById(R.id.editText);
        percentage.addTextChangedListener(new CheckPercentage());
    }
    class CheckPercentage implements TextWatcher {
        public void afterTextChanged(Editable s) {
            try {
                Log.d("Percentage", "input: " + s);
                if(Integer.parseInt(s.toString()) > 100)
                    s.replace(0, s.length(), "100");
            }
            catch(NumberFormatException nfe){}
        }
        public void beforeTextChanged(CharSequence s, int start, int count, int after) {
            // Not used, details on text just before it changed
            // used to track in detail changes made to text, e.g. implement an undo
        }
        public void onTextChanged(CharSequence s, int start, int before, int count) {
            // Not used, details on text at the point change made
        }
    }
}
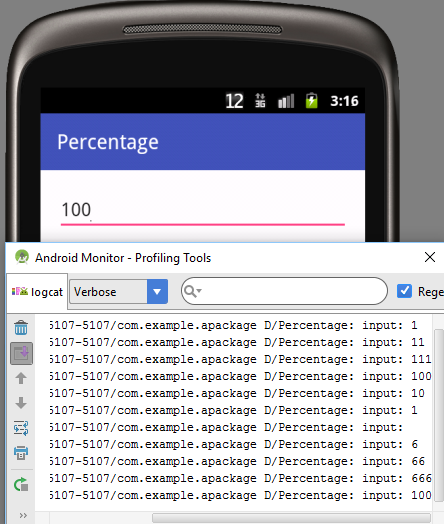
Run the App and enter numbers, if you enter a number larger than 100 it changes to 100, causing the afterTextChanged() method to be called again. When using TextWatchers care must be taken to ensure that the running code does not result in endless looping.

When running the App you will notice that the keyboard changes to fit the type of text required. Since the EditText was restricted to numbers the keyboard automatically switches to digit entry mode, not allowing the input of letters. This is another benefit of declaring appropriate attributes in the layout definition file. It is a good idea to review the attributes that Android views support, as defining them in the XML layout can reduce the amount of code to write. For further details on the attributes supported by EditText see the Android documentation on the TextView, from which EditText is subclassed. Download the file percentage.zip to import the code for this tutorial into Studio.
See Also
- http://developer.android.com/reference/android/widget/TextView.html
- http://developer.android.com/reference/android/widget/EditText.html
- http://developer.android.com/reference/android/text/TextWatcher.html
- If a Rendering Problems message is displayed when viewing layouts see the article Android Studio Rendering Problems.
- See the other Android examples on Tek Eye.
Archived Comments
Moses Katsina said in Novemeber 2017: Thank you! This attribute solved my problem, android:maxLength
Author:Daniel S. Fowler Published: Updated:


