C# Async Await Microseconds Timer with Callback
In the Tek Eye article C# High Resolution Timer a test app for the Stopwatch class was provided. The Stopwatch provides access to the underlying Windows QueryPerformanceCounter, or QPC. In this tutorial the Stopwatch is used to provide a timer implemented using async and await. To see a version that is implemented using a BackgroundWorker see the the Tek Eye article High Speed Regular Events in C Sharp. The timer provided here uses the C# async, await, and a callback, via a C# delegate. It enables very high frequency regular execution of code, down to microsecond (μs) resolution.
In this article the timer is a high performance in terms of event frequency. The timer is far quicker than the standard .Net Timer class which provides timing in milliseconds (ms), or thousandths of a second. The timer class in this tutorial allows for events in the μs range. A microsecond is a millionth of a second. This is an improvement by a factor of a thousand over the standard Timer class. The trade-off is that the microsecond timer will use a CPU thread, however, on modern multi-core, hyper-threaded machines, that should not be an issue.
This tutorial assumes you can edit and run C# code on your development computer. Visual Studio is the Microsoft preferred environment for developing C# code, and is used in this tutorial. A complete coded listing is provided at the end of the article. You can download the Visual Studio solution and projects in microtimer.zip. (Once you unzip the solution and project files you may have to use Windows Explorer to view the files properties and unblock the files. This is a recent Windows security feature. Only download and use files from reputable sources.)
Start a C# Microsecond Timer WinForms Project
Create a new WinForms project in Visual Studio, here called MicroTimerTest. The Form in the MicroTimerTest project is named FrmMicroTimerTest and will be used to test a MicroTimer C# class. Create a project called FastTimer for the MicroTimer class. The project's namespace will be FastTimer, though the class will be named MicroTimer and stored in MicroTimer.cs. Programs reference FastTimer (using FastTimer;) and then use the MicroTimer class to run code at intervals down to microseconds. The MicroTimerTest project is going to simulate hundreds of thousands of dice rolls per second.
Note: Die is the singular of dice, but people say dice for one die, and the same is used in this article.
The code for the dice roll is contained in its own class in a file called Dice.cs, and is based on the dice code from the article C# Dice Roll Code with Stats.

Add a Dice C# class to the MicroTimerTest project, stored in Dice.cs. The Visual Studio solution should then look similar to this:
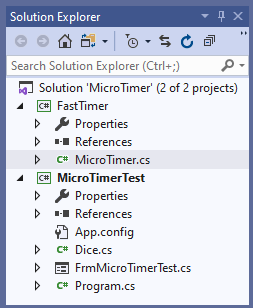
Add the reference to the FastTimer project in the MicroTimerTest project, then add using FastTimer; to the top of FrmMicroTimerTest. Declare a MicroTimer object within FrmMicroTimerTest:
MicroTimer msTimer = new MicroTimer();Add the Dice Code
The code for the Dice class is similar to the dice code in the article linked above. Here implemented as a static class as only one dice is being used. The dice roller simply uses the C# Random class to generate the dice roll. The rest of the code provides some dice rolling statistics:
using System;
using System.Linq;

namespace MicroTimerTest
{
    public static class Dice
    {
        //Store number of rolls of each number
        static long[] rolls = { 0, 0, 0, 0, 0, 0 };
        //Use random for rolling
        static readonly Random roller = new Random();
        //Store the roll;
        static int lastRoll = 0;
        //Perform a dice roll
        public static void Roll()
        {
            //Roll a number 0 to 5
            lastRoll = roller.Next(0, 6);
            //Increment rolled count
            //and correct 0 to 5 -> 1 to 6
            ++rolls[lastRoll++];
        }
        //Get last rolled number
        public static int LastRoll => lastRoll;
        //Totals of each number rolled
        public static long[] Rolls => rolls;
        //Total of all rolls performed
        public static long TotalRolls => rolls.Sum();
        //Total value of all rolled numbers
        public static long[] TotalsOfRolledNumbers => rolls.Select((number, index) => number * (index + 1)).ToArray();
        //Total of all values rolled
        public static long TotalValues => TotalsOfRolledNumbers.Sum();
        //Mean number rolled (double cast required to prevent integer only division)
        public static double MeanValueRolled => TotalValues / (double)TotalRolls;
    }
}
It is the Roll method that will be called by the μs resolution timer, using Dice.Roll(). Start by testing that the dice class is working, build a user interface (UI) to test the Roll method and display the statistics.
Start Building the UI for the Test Program
Drop a Button onto the WinForm, used to test a single roll of the dice, and a Label to store the result of the dice roll. Then 18 labels are needed to display the dice statistics and their captions:
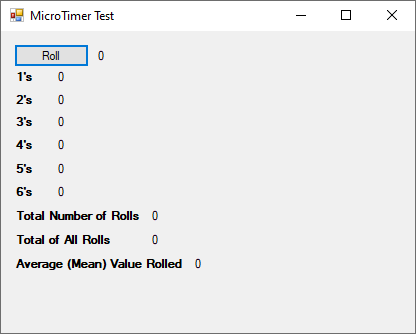
The Button code to roll the dice and update the labels will be similar to this:
private void button1_Click(object sender, EventArgs e)
{
    Dice.Roll();
    UpdateUI(null, 0);
}

void UpdateUI(object sender, int counter)
{
    label1.Text = Dice.LastRoll.ToString();
    label3.Text = Dice.Rolls[0].ToString();
    label5.Text = Dice.Rolls[1].ToString();
    label7.Text = Dice.Rolls[2].ToString();
    label9.Text = Dice.Rolls[3].ToString();
    label11.Text = Dice.Rolls[4].ToString();
    label13.Text = Dice.Rolls[5].ToString();
    label15.Text = Dice.TotalRolls.ToString();
    label17.Text = Dice.TotalValues.ToString();
    label19.Text = Dice.MeanValueRolled.ToString();
}
The function to update the labels has extra parameters which will be used later for a progress report by the MicroTimer.
Building and Testing the MicroTimer Class
With dice code working, build the MicroTimer class. The C# Stopwatch uses the high performance timer in Windows and provides the required resolution for the MicroTimer. Add a Stopwatch to the MicroTimer class:
Stopwatch sw = new Stopwatch();When the MicroTimer fires it will call an external function assigned to a delegate, therefore, add a delegate to the class:
//The delegate used to call an external function
public delegate void ExternalCode();
public ExternalCode OnTimeout;
In FrmMicroTimerTest the Dice.Roll() method is assigned to the delegate after InitializeComponent():
msTimer.OnTimeout += Dice.Roll;A Microseconds property will be used to store the number of microseconds that the timer must count before calling the assigned function (the delegate). The default value is 100μs, which provides a timeout of 0.1 milliseconds, ten times faster than the fastest C# standard Timer setting. The Microseconds value can be set via the class constructor. Within the constructor the microseconds value is converted into the number of CPU ticks, from Stopwatch.Frequency. The CPU ticks are counted to then run the timeout delegate:
//Store the timeout period in microseconds
private int microSeconds;
//and the equivalent CPU ticks
private long microSecondsInCPUTicks;
//Accessors for the microseconds property
//and conversion to the CPU ticks equivalent
public int MicroSeconds
{
    get
    {
        return microSeconds;
    }
    set
    {
        microSeconds = value;
        microSecondsInCPUTicks = value * Stopwatch.Frequency / 1000000L;
    }
}
//Constructors
public MicroTimer(int microSeconds = 100) => MicroSeconds = microSeconds;
Separating Regular UI Updates from the Fast Running Code
This timer is likely to be used for code that needs to be run at high frequency. Therefore, UI updates are unlikley to be possible within the time critical code. To support an additional update method for user feedback, the MicroTimer will support the use of the Progress object. The Progress class supports the Report method that can be used to send feedback to the UI thread:
//Progress reporter
public IProgress<int> Updater { get; set; }
Milliseconds are used for the feedback rate:
//Default feedback rate to a 10th of a second
private int feedbackMilliseconds = 100;
//in the equivalent CPU ticks
private long feedbackSecondsInCPUTicks = Stopwatch.Frequency / 100;
public int FeedbackMilliseconds
{
    get
    {
        return feedbackMilliseconds;
    }
    set
    {
        feedbackMilliseconds = value;
        feedbackSecondsInCPUTicks = value * Stopwatch.Frequency / 1000;
    }
}
The MicroSeconds, Updater, and FeedbackMilliseconds properties, and the internal variables they set, will be used in the microsecond timing function.
Setting the Microseconds and FeedbackMilliseconds in the UI
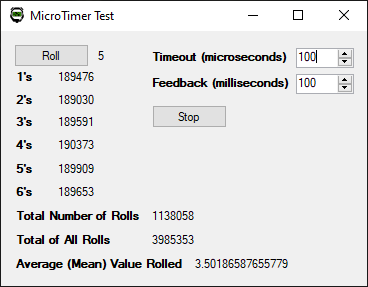
Test the Microseconds and FeedbackMilliseconds properties in the UI. Drop two NumericUpDowncontrols onto the test form, they support typing in numeric values and will be used to read and set the Microseconds and FeedbackMilliseconds properties. Set the Minimum values for the NumericUpDown controls to 1, and the Maximum values as required, e.g. 10000000 (10,000,000μs, i.e. 10 seconds) for the Microseconds, and 1000 (1 second) for the FeedbackMilliseconds:
public FrmMicroTimerTest()
{
    InitializeComponent();
    msTimer.OnTimeout += Dice.Roll;
    numericUpDown1.Value = msTimer.MicroSeconds;
    numericUpDown2.Value = msTimer.FeedbackMilliseconds;
}
private void numericUpDown1_ValueChanged(object sender, EventArgs e)
{
    msTimer.MicroSeconds = (int)numericUpDown1.Value;
}
private void numericUpDown2_ValueChanged(object sender, EventArgs e)
{
    msTimer.FeedbackMilliseconds = (int)numericUpDown2.Value;
}
Supporting Cancellation of the Timer Events
The microseconds timer will run on a different thread from the UI. This is achieved using C# async and await. Stopping the timer from the UI is via a CancellationToken, which is provided to the timing thread via CancellationTokenSource when the await is executed:
//Support cancelling to stop the timer
CancellationTokenSource stopTimer;
A new CancellationTokenSource will be declared when the timing function is started. To send a cancel request to the timing function the Cancel() method is used:
//Stop the timer
public void Stop()
{
    if(stopTimer != null)
        stopTimer.Cancel();
}
The Core MicroTimer Function
The core Timing function in the MicroTimer takes the Progress object and a CancellationToken. The function then starts the Stopwatch, this runs until stopped by the CancellationToken. While the Stopwatch runs the set microseconds interval, based on the Stopwatch frequency, is calculated. That interval is used to check the number of ElapsedTicks by the Stopwatch, and loops until the interval has passed. The external code attached to the OnTimeout delegate can then be called. A progressCounter is incremented on each interval and once the set progress period has been reached the Report function is called to inform the original (usually UI) thread:
//Run the timer
void Timing(IProgress<int> progress, CancellationToken cancelTimimg)
{
    //Calculates the timing difference
    long interval;
    //Counter for progress timing
    int progressCounter = 0;
    //Start the stopwatch
    sw.Start();
    //Loop until stopped
    while (sw.IsRunning)
    {
        //Get interval to wait
        interval = sw.ElapsedTicks + microSecondsInCPUTicks;
        //Loop until interval has passed
        while (interval - sw.ElapsedTicks > 0)
        {
            //Chance for kernel to yield the tight CPU loop
            Thread.Sleep(0);
        }
        //Run the external code
        OnTimeout();
        //see if a progress report is required
        if (++progressCounter >= feedbackSecondsInCPUTicks / microSecondsInCPUTicks)
        {
            progress.Report(progressCounter);
            progressCounter = 0;
        }
        if (cancelTimimg.IsCancellationRequested)
            sw.Stop();
    }
}
The IsCancellationRequested property of the CancellationToken is used to stop the MicroTimer (see the Stop method in the previous section), and this causes the timing function to exit.
Using async await to Start the MicroTimer
If the MicroTimer has not been started, and the delegate has been set, then a new CancellationTokenSource is created and passed with the set Progress object to the Timing function. The Timing function is called using await and Task.Run(). The use of Task.Run() is because the Timing function is a CPU bound operation. When Timing stops the CancellationTokenSource can be disposed off and set to null ready for the next start request. The Start method is declared with async because of the use of await:
//Start the MicroTimer
public async void Start()
{
    if (stopTimer == null && OnTimeout != null)
    {
        stopTimer = new CancellationTokenSource();
        await Task.Run(() => Timing(Updater, stopTimer.Token));
        stopTimer.Dispose();
        stopTimer = null;
    }
}
A button added to the form (with the Text set to Start initially) toggles between starting and stopping the MicroTimer. When the MicroTimer is started a new Progress object is created and assigned to the MicroTimer. The ProgressChanged event is set to the function that updates the forms labels with the dice statistics:
Progress<int> update;
private void button2_Click(object sender, EventArgs e)
{
    //Start/stop the timer
    if (button2.Text == "Start")
    {
        //Change button to stop
        button2.Text = "Stop";
        //Progress used to hook the code to execute on the tick
        if (update == null)
        {
            update = new Progress<int>();
            update.ProgressChanged += UpdateUI;
            msTimer.Updater = update;
        }
        //Start the timer
        msTimer.Start();
    }
    else
    {
        //Stop the timer
        msTimer.Stop();
        //Change button to start
        button2.Text = "Start";
    }
}
Maximising the MicroTimer's Code Execution Frequency
The MicroTimer's delegate is used to execute code at a rate determined by the MicroTimer's Microsecond property. Therefore, to optimize the code execution rate, the Microsecond property is set slightly larger than the known execution time of that code. See the Tek Eye article Measuring Code Execution Time in C Sharp to help determine a value for the Microseconds property. Unfortunately, code execution time can vary as Windows is not a realtime operating system, and different PCs use different speed processors. On some high end PCs, the Dice.Roll() used in this article can be run at the lowest MicroTimer setting of 1μs. This allow upto a million dice rolls to be performed per second, a 1000 times better than using the normal .NET Timer class.
A Final MicroTimer Property
The IsRunning property of the Stopwatch class can be used by a program to see if the MicroTimer is executing. This is done by exposing IsRunning in the MicroTimer:
//Stopwatch IsRunning used for a MicroTimer IsRunning property
public bool IsRunning => sw.IsRunning;
MicroTimer Class and Test Form Full Code
This is the full code for the MicroTimer class:
using System;
using System.Diagnostics;
using System.Threading;
using System.Threading.Tasks;

namespace FastTimer
{
    public class MicroTimer
    {
        //The stopwatch uses the system's high performance counter
        Stopwatch sw = new Stopwatch();
        //The delegate used to call an external function
        public delegate void ExternalCode();
        public ExternalCode OnTimeout;
        //Store the timeout period in microseconds
        private int microSeconds =  100;
        //and the equivalent CPU ticks (1000000/100=10000)
        private long microSecondsInCPUTicks = Stopwatch.Frequency / 10000;
        //Accessors for the microseconds property
        //and conversion to the CPU ticks equivalent
        public int MicroSeconds
        {
            get
            {
                return microSeconds;
            }
            set
            {
                microSeconds = value;
                microSecondsInCPUTicks = value * Stopwatch.Frequency / 1000000;
            }
        }
        //Progress reporter
        public IProgress<int> Updater { get; set; }
        //Default feedback rate to a 10th of a second
        private int feedbackMilliseconds = 100;
        //in the equivalent CPU ticks
        private long feedbackSecondsInCPUTicks = Stopwatch.Frequency / 100;
        //Accessors for the feedbackMilliseconds property
        //and conversion to the CPU ticks equivalent
        public int FeedbackMilliseconds
        {
            get
            {
                return feedbackMilliseconds;
            }
            set
            {
                feedbackMilliseconds = value;
                feedbackSecondsInCPUTicks = value * Stopwatch.Frequency / 1000;
            }
        }
        //Support cancelling to stop the timer
        CancellationTokenSource stopTimer;
        //Stop the timer
        public void Stop()
        {
            if(stopTimer != null)
                stopTimer.Cancel();
        }
        //Start the MicroTimer (async for new thread)
        public async void Start()
        {
            //Start if delegate set
            if (stopTimer == null && OnTimeout != null)
            {
                //Need to be able to cancel the MicroTimer
                stopTimer = new CancellationTokenSource();
                //CPU bound task, hence Task.Run
                await Task.Run(() => Timing(Updater, stopTimer.Token));
                //When Timing function returns, finished with CancellationTokenSource
                stopTimer.Dispose();
                stopTimer = null;
            }
        }
        //Run the timer
        void Timing(IProgress<int> progress, CancellationToken cancelTimimg)
        {
            //Calculates the timing difference
            long interval;
            //Counter for progress timing
            int progressCounter = 0;
            //Start the stopwatch
            sw.Start();
            //Loop until stopped
            while (sw.IsRunning)
            {
                //Get interval to wait
                interval = sw.ElapsedTicks + microSecondsInCPUTicks;
                //Loop until interval has passed
                while (interval - sw.ElapsedTicks > 0)
                {
                    //Chance for kernel to yield the tight CPU loop
                    Thread.Sleep(0);
                }
                //Run the external code
                OnTimeout();
                //see if a progress report is required
                if (++progressCounter >= feedbackSecondsInCPUTicks / microSecondsInCPUTicks)
                {
                    progress.Report(progressCounter);
                    progressCounter = 0;
                }
                if (cancelTimimg.IsCancellationRequested)
                    sw.Stop();
            }
        }
        //Stopwatch IsRunning used for a MicroTimer IsRunning property
        public bool IsRunning => sw.IsRunning;
    }
}
The following code for FrmMicroTimerTest does not include the designer code, use the earlier form image to design the UI, the code will then be similar to this listing:
using System;
using System.Windows.Forms;
using FastTimer;

namespace MicroTimerTest
{
    public partial class FrmMicroTimerTest : Form
    {
        //Create a new MicroTimer
        MicroTimer msTimer = new MicroTimer();
        public FrmMicroTimerTest()
        {
            InitializeComponent();
            //Set the Microseconds and FeedbackMiliseconds
            //properties via the UI (NumericUpDowns)
            numericUpDown1.Value = msTimer.MicroSeconds;
            numericUpDown2.Value = msTimer.FeedbackMilliseconds;
            //Assign the function to execute at a high rate
            msTimer.OnTimeout += Dice.Roll;
        }
        private void numericUpDown1_ValueChanged(object sender, EventArgs e)
        {
            msTimer.MicroSeconds = (int)numericUpDown1.Value;
        }
        private void numericUpDown2_ValueChanged(object sender, EventArgs e)
        {
            msTimer.FeedbackMilliseconds = (int)numericUpDown2.Value;
        }
        //Test the dice roll code
        private void button1_Click(object sender, EventArgs e)
        {
            Dice.Roll();
            //Same UI Update used by Progress object
            UpdateUI(null, 0);
        }
        //Update UI with dice roll statistics
        void UpdateUI(object sender, int counter)
        {
            label1.Text = Dice.LastRoll.ToString();
            label3.Text = Dice.Rolls[0].ToString();
            label5.Text = Dice.Rolls[1].ToString();
            label7.Text = Dice.Rolls[2].ToString();
            label9.Text = Dice.Rolls[3].ToString();
            label11.Text = Dice.Rolls[4].ToString();
            label13.Text = Dice.Rolls[5].ToString();
            label15.Text = Dice.TotalRolls.ToString();
            label17.Text = Dice.TotalValues.ToString();
            label19.Text = Dice.MeanValueRolled.ToString();
        }
        //The Progress object
        Progress<int> update;
        private void button2_Click(object sender, EventArgs e)
        {
            //Start/stop the timer
            if (button2.Text == "Start")
            {
                //Change button to stop
                button2.Text = "Stop";
                //Progress used to update UI
                if (update == null)
                {
                    update = new Progress<int>();
                    //also uses the UpdateUI function
                    update.ProgressChanged += UpdateUI;
                    //Assign the Progress object to the MicroTimer
                    msTimer.Updater = update;
                }
                //Start the timer
                msTimer.Start();
            }
            else
            {
                //Stop the timer
                msTimer.Stop();
                //Change button to start
                button2.Text = "Start";
            }
        }
    }
}
If you come across anyway to improve the code in this article then send it to Tek Eye and it can be shared with other readers. You can download the code as a Visual Studio solution in microtimer.zip.
See Also
- C# High Resolution Timer
- High Speed Regular Events in C Sharp
- For a full list of the articles on Tek Eye see the website's index
Author:Daniel S. Fowler Published:


