Install Apache on CentOS to Configure VPS Test System
This article is a tutorial on the setting up of a web server on a CentOS system using the Apache HTTP Server. This article is based upon using the minimal ISO install of CentOS, typically used on a Virtual Private Server (VPS). The full CentOS DVD ISO has Apache, unlike the minimal CentOS ISO. This article is also useful for a CentOS 7 DVD install if Basic Web Server was not chosen in the Software Selection option. There is information on starting the Apache server when the CentOS installation is complete.
Why Minimal CentOS?
The CentOS version of GNU/Linux is popular because it is derived from the commercial Red Hat Enterprise Linux (RHEL) which is used by many large organisations. CentOS is often one of the choices available when setting up a VPS or dedicated server. Such a server is used for hosting Internet or cloud based services or web sites. A server only needs to run the software to provide the required services, e.g. user friendly desktop functionality is not required. Thus a basic CentOS install suffices. The minimal CentOS install can be configured with only the required software to provide the needed services.

Once an Internet or cloud based server is up and running further updates can potentially disrupt services. To minimise disruptions updates can be tested locally on a Virtual Machine (VM). A VM will mimic the live server configuration, ensuring that changes can be tested and confirmed working before installing to the live system.
Using VirtualBox to Run a Minimal CentOS Install
This article assumes that a default minimal CentOS server is available and has been installed on a VM, in this case using VirtualBox. The CentOS VM is then accessed using a Secure Shell (SSH) to mimic accessing a remote server. See our article SSH into VPS Virtual Machine on Windows Using PuTTY to see how to configure a similar set up. Also the article CentOS Version Command and Update CentOS to New Version is useful.
Install Apache on CentOS Over SSH
If you need to check to see if the Apache Web Server is installed enter the command apachectl status at the prompt. A command not found message is displayed if Apache is not installed. The yum command is used to install Apache:
[root@testserver ~]# yum install httpdThe installation will need confirming with y. If not logged in as root you can use sudo to run the command, assuming that the user has been given sudo ability and enters their password correctly. Using sudo applies to all commands in this tutorial.
There is also the yum groupinstall "Web Server" command for a more comprehensive installation of packages to support web server operations with Perl and Python (use the command yum groupinfo "Web Server" to see the contents). Next start the Apache HTTPD Server using:
[root@testserver ~]# apachectl startThe command service httpd start will also start httpd. If the server is rebooted then Apache will need restarting. To automatically have Apache restart on reboot use the chkconfig utility (CentOS 6) or systemctl (CentOS 7).
CentOS 6 command to enable httpd on boot:
[root@testserver ~]# chkconfig httpd onCentOS 7 command to enable httpd on boot:
[root@testserver ~]# systemctl enable httpd.serviceError "Job for httpd.service failed."
It has been noticed that on some fresh CentOS installs Apache cannot start. When the apachectl start command is issued an error is displayed:
Job for httpd.service failed. See 'systemctl status httpd.service' and 'journalctl -xn' for details.Reinstalling CentOS and Apache can clear this error.
Allow Web Traffic to Access the Apache Web Server Port.
The default port for web traffic is port 80. For the minimal CentOS this port is blocked by default, it needs to be opened to allow Apache to serve web page requests. Depending upon the verison of CentOS being used this is done via iptables (CentOS 6) or firewalld (CentOS 7).
Open Port 80 on CentOS 6 Minimal
On CentOS 6 iptables is used to filter network traffic. The default iptables settings for the minimal CentOS installation is to only allow SSH traffic (on port 22). The current iptables settings can be listed with this command:
[root@testserver ~]# iptables -L -n –lineApache listens on port 80, which requires editing the iptables rules configuration file using vi and restarting the firewall.
Adding an Iptables Firewall Rule for Apache Using Vi
Use vi to edit the firewall rules:
# vi /etc/sysconfig/iptablesMove the cursor to the line after the SSH rule (contains –dport 22) and enter insert mode (by pressing i). Enter the new rule:
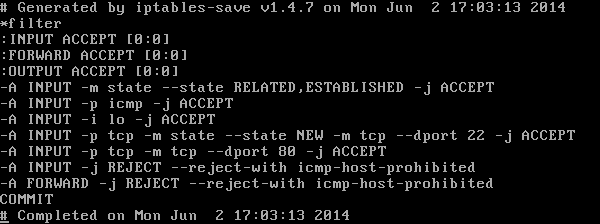
-A INPUT -p tcp -m tcp –dport 80 -j ACCEPTThe iptables rules for a default minimal CentOS 6 for Apache will look something like this screenshot:

Save the file and quit (using :wq). Restart iptables to enable the new Apache firewall rule by issuing the command:
[root@testserver ~]# /etc/init.d/iptables restartOpen Port 80 on CentOS 7 Minimal Using the Firewall Daemon
CentOS 7 uses firewalld to control port access. The firewalld process is a "dynamic firewall daemon", i.e. it allows changes to be made without affecting the currently running processes. The firewalld rules are stored in zones. The default zone on installation is public. To allow TCP traffic on port 80 in CentOS 7 enter this firewalld command:
[root@testserver ~]# firewall-cmd --zone=public --add-port=80/tcp --permanentThen reload the firewalld rules:
[root@testserver ~]# firewall-cmd --reloadFor more detailed information on the Firewall Daemon see Using Firewalls at Red Hat.
Test the Apache Web Server is Running
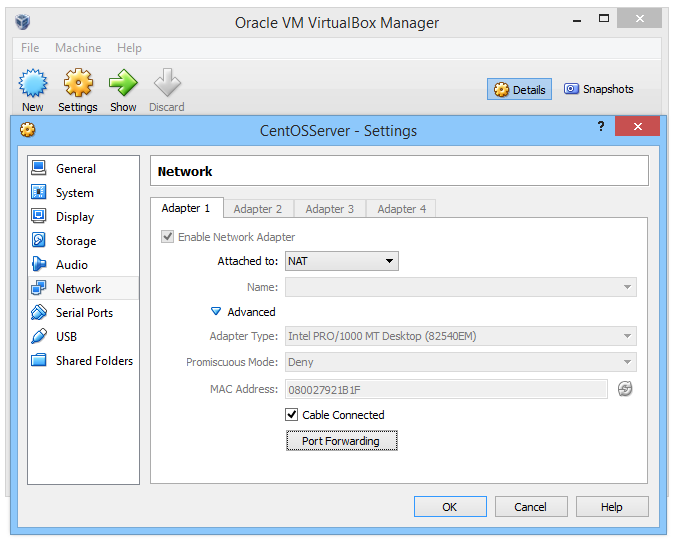
Using the web browser access the newly installed Apache HTTPD Server. If accessing a remote server use the assigned IP address. To access a local VM the same method is used as for SSH. In this case Network Address Translation (NAT). For the VM configure a NAT port forwarding rule. With the VM highlighted in the VirtualBox Manager click the Settings icon or use the Machine menu and select Settings then select Network.

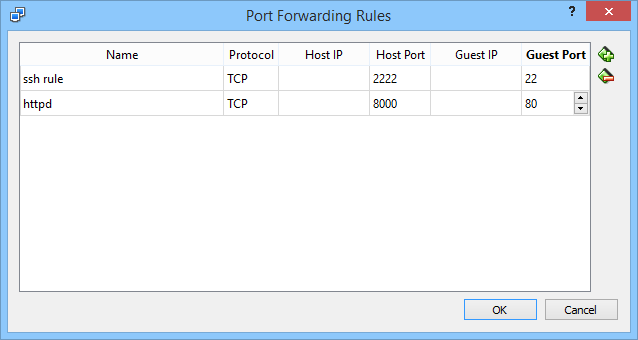
Adapter 1 is the default virtual network adapter enabled for the VM. Click Advanced then click the Port Forwarding button. On the Port Forwarding Rules dialog click the Insert new rule icon. Give the new rule a name, e.g. httpd, the protocol will be TCP, Host IP address is blank. Choose a Host Port such as 8000, Guest IP is blank and Guest Port will be 80. Click OK to create the new rule.

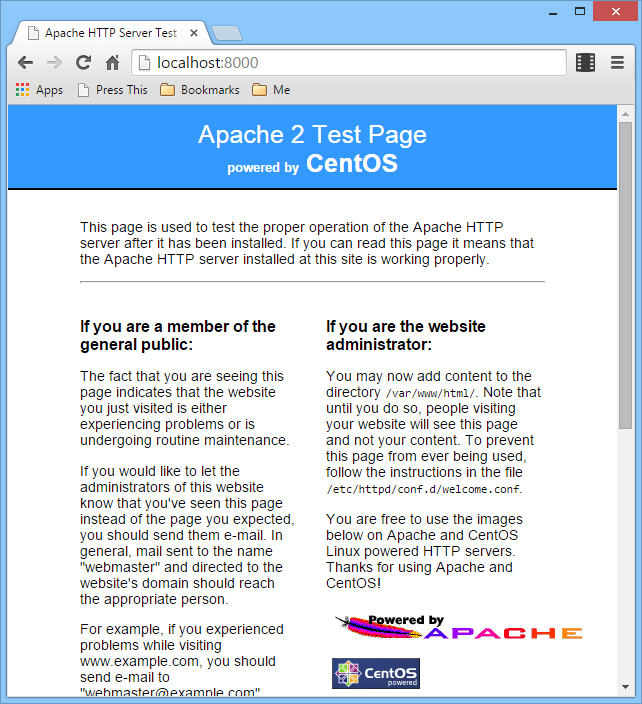
Depending upon the version of VirtualBox used the VM may require a restart. The local browser can now access Apache on the VirtualBox VM using the address localhost:8000:

The default location for web content files (HTML, images, JavaScript and CSS) on the CentOS server is the /var/www/html directory. The VM based VPS can be used to test web sites before updating live servers.
Author:Daniel S. Fowler Published: Updated:


