Move Documents and Other Personal Folders in Windows
In the Microsoft Windows Operating System (OS) each user account is given a set of private (also known as personal) folders for storing different types of file. This applies to Windows 10 and earlier versions, i.e. Windows 8.1, Windows 8 and Windows 7 (Windows Vista and earlier versions are no longer supported by Microsoft). This tutorial covers in detail how to move the user folders using the Location tab on the private folder's property dialog. (Moving the OneDrive folder requires some additional steps which will be detailed.)
Why Moving Windows User Folders May be Required?
In a default installation a user's folders and files are located on the same hard drive as Windows. Normally the first, and often the only, hard disk in the system is called the C: drive. The C: drive will be the default location for any additional programs or apps that are installed. This can be a problem if the Windows hard drive is small. For example some early Solid State Disk (SSD) based desktop and laptop Personal Computers (PCs) were fitted with a 60 or 64 gigabyte (GB) hardrive. A Windows 10 install can take up half that space, as shown in this article, leaving litte room for user files. For a new computer people will ask: What is taking up space on my hard drive? For a new PC the answer is probably Windows itself. Surprisingly some tablets and laptops (and even desktops) were supplied with 32 GB SSDs! With those a single Windows update can wipe out all the free space for user files.
Having all the user folders on the one hard disk drive, alongside Windows and all the programs, makes configuration and manufacture of a new computer easier. Unfortunately it has several disadvantages:
- If the disk fails the operating system, programs and all user data fails all at once.
- Upgrading to a newer version of Windows does not allow for a clean install (the users files and programs must usually remain in place).
- If a lot of program and user files are on the disk it can become full and prevent Windows from working correctly.
- When performing a disk upgrade to a bigger and, or, faster disk, user data and OS must be handled as a single backup or image.
Another option is to use at least two disks. Firstly a smaller but very fast SSD disk on which the OS is installed (for faster booting and OS performance). Secondly a much larger disk, maybe a mechanical Hard Disk Drive (HDD), that will hold large amounts of user data. Some PCs have this configuration. Depending upon what software needs to be installed and the size of the two disks, programs can either be installed to the Windows drive or the second drive. The combination of a SSD C: drive for the OS, and a traditional HDD D: drive for data is due to SSDs being more expensive per gigabyte than HDDs. For SSDs their advantage is the improved performance due to having no mechanical parts. (Note: The second drive does not, or may not, have the letter D:, another letter may be assigned, such as E: or F:, it depends upon the type of computer and its hardware.)
With a second hard drive fitted, or for a tablet PC a Secure Digital (SD) memory card added, the Documents folder and other user folders can be moved off the low capacity C: drive. The SSD is then used for the Windows OS, and a much larger drive for user data. So how do you move your documents folder and other folders to another drive in Windows 10? This is covered next.
Tutorial on Moving User Documents and Personal Folders to Another Drive
Each user's private location on a Windows PC has different folders for the different types of files that are used or worked on. The files can be pictures, documents, music, emails, videos and anything else that the user generates. The folders used are private because other users cannot view their contents (unless they are an Administrator on the machine). When the user logs on they can work with their private files and any Public files. To let other users see their work it needs be moved or copied into the relevant Public folders, or a directory needs to be marked as shared.
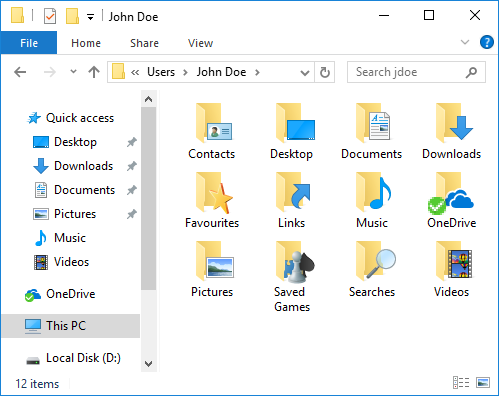
Each user added in Windows is located under the Users folder on C:, so a user called John Doe has folders located at C:\Users\John Doe. Under the user's main folder is a folder to store different types of files that programs generate or require. For example there is a Pictures folder (e.g. at C:\Users\John Doe\Pictures) to store images. Use File Explorer to view the users folders. (File Explorer should be on the Taskbar, or hold the Windows key and press E, or type fil in the search box to find it). The various folders created by Windows for the user can be seen under This PC, or under the user’s name in C:\Users.
What is a Virtual Folder?
Before looking at the detail of moving the user folders it is worth knowing about Windows special folders, or virtual folders. These act like normal folders but appear with different icons and have more features. Plus they allow the same folder to appear in more than one location, to allow for quicker access, i.e. a virtual folder is a type of shortcut mechanism. Desktop and OneDrive are examples that appear as icons in File Explorer but are really folder locations, e.g. C:\Users\John Doe\Desktop and C:\Users\John Doe\OneDrive.
In Windows 7 some virtual folders begin with My, such as My Documents or My Music. However, the actual folder name on the hard disk does not have My, thus My Documents in File Explorer points to C:\Users\John Doe\Documents. This table shows the folder name, the display name in Windows 7 Explorer, and whether or not a public folder version maybe available, located at C:\Users\Public (this folder itself can be used to make files public).
| Folder | Win 7 Name in Explorer | Public Version |
|---|---|---|
| Contacts | Contacts | N/A |
| Desktop | Desktop | Public Desktop |
| Documents | My Documents | Public Documents |
| Downloads | Downloads | Public Downloads |
| Favorites | Favorites | N/A |
| Links | Links | N/A |
| Music | My Music | Public Music |
| OneDrive | OneDrive or SkyDrive | Public Music |
| Pictures | My Pictures | Public Pictures |
| Saved Games | Saved Games | N/A |
| Searches | Searches | N/A |
| Videos | My Videos | Public Videos |
Move Documents and Other Personal Folders to Another Drive
When Windows is installed on C:, the default for new users is for their folders to be created on C:. Move the Documents and other personal folders to the D: drive (or another hard drive) with File Explorer. The other drive should already be formatted, i.e. it appears as D: or another letter in Explorer. Plus the target drive should have plenty of free space. Firstly moving a standard user folder, e.g. Pictures, then the OneDrive folder, which requires extra steps.
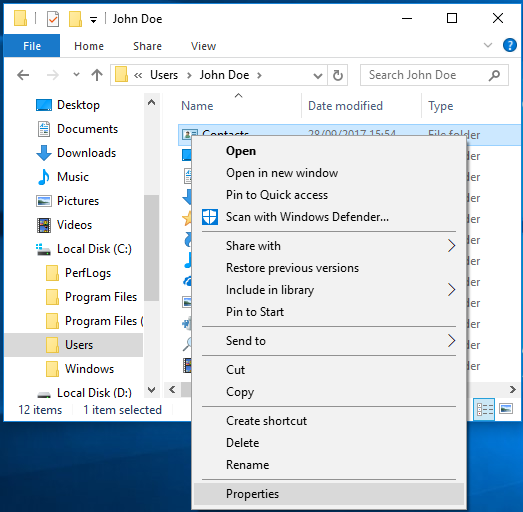
In File Explorer locate the required user folder. For example for user John Doe open C:\Users\John Doe. All of the various folders for the user will be visible. All or any number of these folders can be relocated to another drive. This is done via the Properties option on the context menu for the particular user folder. (The context menu is usually opened with the right-click button on the mouse.) Bring up the context menu on the first folder under the John Doe folder, here it is Contacts, click Properties.
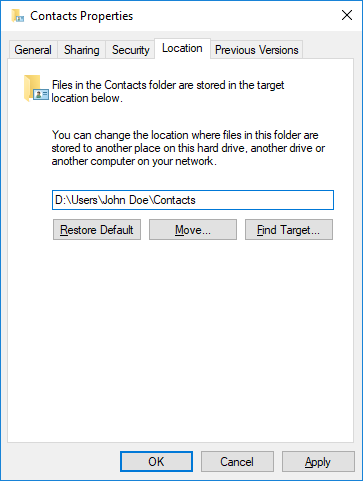
The dialog for the folder properties appears. Click on the Location tab. A box will show the current physical location of the Contacts folder being C:\Users\John Doe\Contacts. The entry is changed to be D:\Users\John Doe\Contacts. The new location of the folder, remember it may not be a D: drive on your system, use the correct letter of the drive to which the folder is being moved (and the correct name, here John Doe is used as the example). The new folder does not need to exist as it will be created. Click on the OK button to move the folder to the new location.
A message box will appear warning that the new location does not exist.
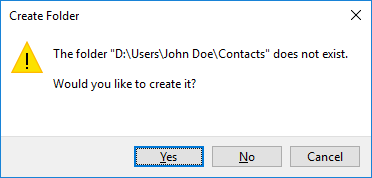
Select Yes to create the new location. Another message box will appear to confirm that the contents of the folder should be moved. Select Yes because the new locations are to contain all the files.
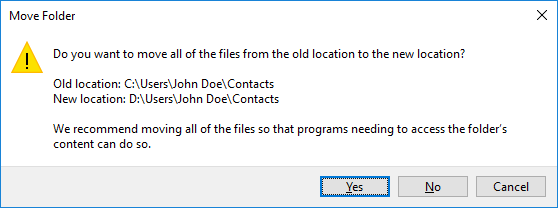
After a short pause, depending upon the number of files that need to be moved, Explorer will update and show that the Contacts folder is no longer under C:\Users\John Doe. Repeat the procedure for each of the folders under C:\Users\John Doe. For each folder bring up the context menu (right click), select the location tab. Change C: to D: (or whatever drive letter is required) in the path to the folder. Click OK and then Yes to each of the message boxes. Once that has been done you can select the new location in Explorer to see the results. The new folder locations do not affect how the files are viewed as virtual folders from within Explorer, but the physical folders now sit on a different drive. Next the steps for moving the OneDrive folder.
Move the OneDrive Folder to a new Location
Moving the OneDrive folder to a new location requires extra steps to ensure the cloud syncing is connected correctly. The first step is to unlink from the cloud. Access the OneDrive settings from the Taskbar, usually in the hidden icons settings accessed via the up arrow icon. Use the context menu or the OneDrive gear icon to access OneDrive settings.
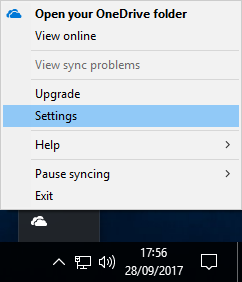
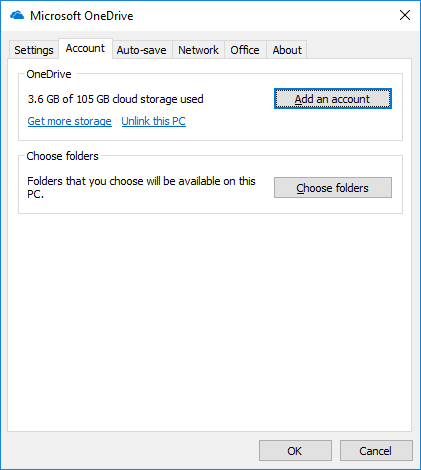
Choose the Unlink this PC option.
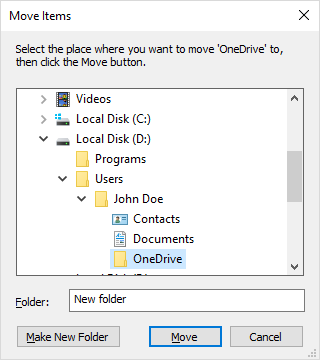
With File Explorer use the Move to option to move the OneDrive folder.
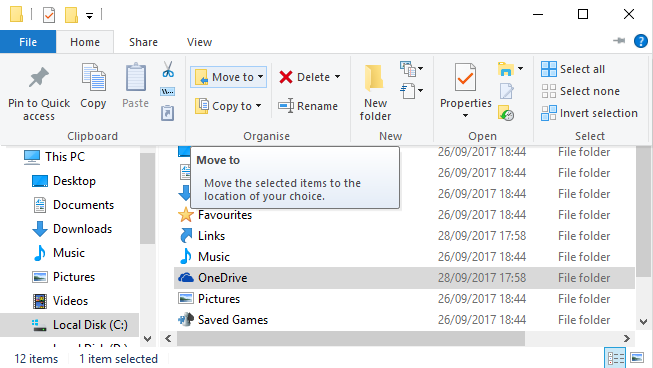
You will create the new OneDrive folder and select it as the move location.
Setting Up and Reconnecting OneDrive to the Cloud
Now reconnect OneDrive to the cloud. Click on the OneDrive icon in the Taskbar.
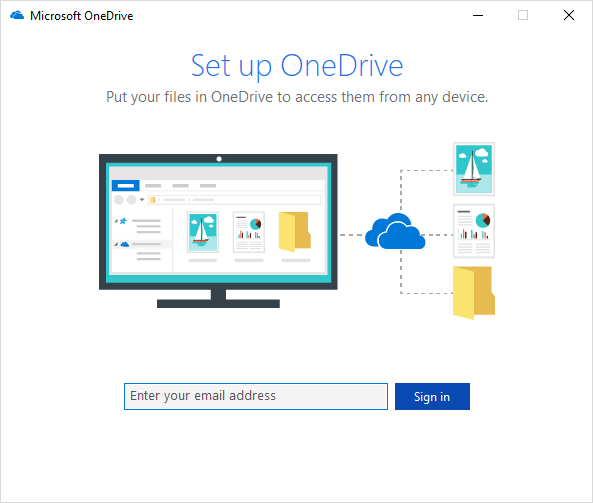
Enter the Windows account email, click Sign in and then enter the Windows account password on the next dialog. Then the OneDrive folder can be changed from the default location.
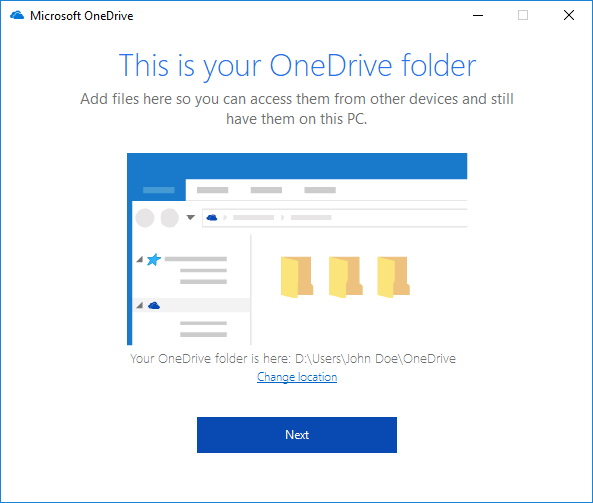
Click on Change location and select the new user's folder on the new drive. E.g. select D:\Users\John Doe. Note: if you select D:\Users\John Doe\OneDrive it sets the location to D:\Users\John Doe\OneDrive\OneDrive. You are selecting the location FOR the OneDrive folder. Hence choose D:\Users\John Doe. This will correctly set OneDrive to D:\Users\John Doe\OneDrive. Click Next and confirm with Use this location.
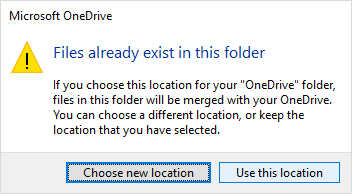
This warning is displayed because of the previous OneDrive folder move. We want to use the new location so choose the Use this location option.
When the Sync your OneDrive files to this PC dialog is displayed selected Next. (The Sync all files and folder in OneDrive option is selected by default. This should be fine for normal day-to-day usage. Otherwise just choose specific folders to sync.) You may see an advert for Microsoft Office, choose Not now to ignore it. Finally view or close the Welcome to OneDrive message.
Programs with Hard Coded Paths to Documents and Other Personal Folders
One thing to keep in mind is that some programs, particularly Command Prompt batch (script) files or programs, have hard coded references to files and folders. This means that some programs may not like standard folders being moved from the default location. Fortunately this problem has been around long enough for a solution, and that solution is to use a symbolic link, also known as a symlink.
So how do you use a symlink in Windows? There is a command line utility mklink.exe (for make link), or use the Sysinternals Junction tool. Open a Command Prompt to run mklink. To find and open Command Prompt type com in the search box, or hold the Windows key and press X then select Command Prompt. Type mklink and press the Enter key to see the command options. For folders that have been moved a Directory Junction is required. So for a user’s Contacts folder moved from C:\Users\John Doe\Contacts to D:\Users\John Does\Contacts the command would be:
mklink /J "C:\Users\John Doe\Contacts" "D:\Users\John Doe\Contacts"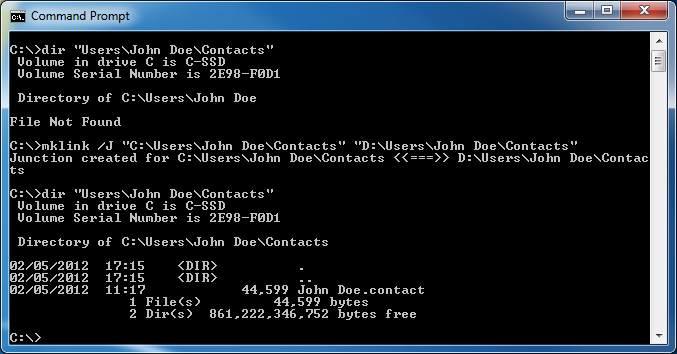
Summary
This guide has shown how straightforward it is to move your Windows personal work folders. It has given an example on how to move the Contacts folder and other personal folders, including OneDrive, from the default location to a new drive. This is done via the folders properties, or for OneDrive by unlinking and moving the folder. For programs that need to use the old location a link to the new location can be created with mklink. Even if you are not using an SSD, having two drives on your computer has advantages. If the drives are big enough they can be used to hold a back up of the other one. This makes restoring from a failed drive easier. Separate data and operating system drives also help with future operating system and computer upgrades.
Archived Comments
Thomas J. Wolfe on May 30, 2014 at 1:28 am said: Should I also move the App Data folder to the D drive?
Tek Eye on May 30, 2014 at 11:14 am said: Hi Thomas,
The AppData is a hidden folder containing settings, files and data used by applications installed on to the PC. It can be regarded as a system folder and as such needs to be handled with care as changes to the folder can cause problems for installed applications. This is the warning from the following Microsoft page. (Update: Link removed as no longer available.)
We don’t recommend moving, deleting or making any changes to files or folders in the AppData folder. Doing so could make your applications run poorly or stop working entirely.
There are other articles on the Internet about moving AppData that requires use of the Registry editor. This article covered using Explorer to move user’s folders as it is a safe, straightforward and reversible method. If you do want to move AppData it is recommended that all applications are uninstalled before the move. Once AppData has been moved (following instructions from elsewhere) applications can be installed again. This insures that the applications know where the AppData folder is located. Even then some applications may use hard coded paths and a Symlink for AppData may need to be generated. In my experience moving AppData caused more troubles than it solved. Changing settings in individual applications for where they store their data is often a better option.
Hope this helps.
See Also
- For a full list of all the articles in Tek Eye see the full site Index.
Author:Daniel S. Fowler Published: Updated:


