SoftwareDistribution Folder Delete in Windows
When deep cleaning Windows to recover disk space, performing a SoftwareDistribution folder cleanup is one task that may help. This article explains how Windows uses the SoftwareDistribution folder and covers cleaning the folder to help free up disk space. This applies to current versions of Microsoft Windows, i.e. from Windows 7 to Windows 10. In summary it involves stopping the Windows Update service, deleting the SoftwareDistribution\Download folder, and restarting the Windows Update service.
![]()
What is the SoftwareDistribution Folder in Windows?
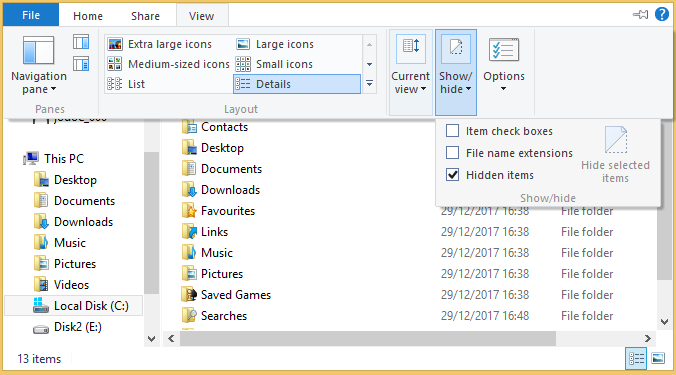
A laptop or Personal Computer (PC) running Windows regularly performs a Windows Update. The updates improve security, fix bugs and add or change functionality. The Windows update files download to a temporary folder on the PC. Once the files have finished downloading in the background, the update can be applied to the PC. The temporary folder is called Download under SoftwareDistribution in the Windows directory, i.e. C:\Windows\SoftwareDistribution\Download (unless Windows has been installed to a different drive or directory). If trying to view this folder in Windows Explorer you may need to give permission and be logged in as an Administrator, as well as turning on Hidden items in the View menu (or via Organise and Folder and search options in Windows 7).

Clean Up The SoftwareDistribution Folder in Windows to Free Up Disk Space
When the system drive runs low on disk space some free space may be reclaimed by deleting this Windows Update temporary downloads folder. Therefore, a full SoftwareDistribution folder delete is not done, just the Download folder in that directory. The SoftwareDistribution\Download folder delete may fix problems that stop the Disk Clean-up utility from finishing. (The Disk Clean-up utility can take quite a while to finish, and if still not finished after a few hours it may be stuck due to Windows Update conflicts.)
Apply Any Remaining Windows Updates
If the SoftwareDistribution\Download folder delete is performed before Windows Update has installed existing download files, then those files will download again. To stop this from happening ensure Windows Update has completed. Open Windows Update. In Windows select Settings (the gear icon) then Windows Update, or enter Update in the search box and select Check for updates. In Windows 7 select Windows Update from All Programs via the Start button (or Start then Control Panel then System and Security).
Select Check for updates to ensure that no updates are available. Install any Windows updates so that "Your device is up to date". (If low on disk space updates may fail to apply, try emptying the Recycle Bin, clearing browser caches or running the Disk Clean-up utility.)
Temporarily Stop the Windows Update Service
With all Windows updates applied stop the Windows Update service to safely remove the \Windows\SoftwareDistribution\Download folder. Run Task Manager (press the Ctrl-Alt-Delete keys all at once and select Task Manager or search for Task Manager and select it). Click the Services tab. Sort the list by name (click the Name column). Browse to the wuauserv entry and check the Status column. If it says Running stop the wuauserv service. To stop the service select Open Services at the bottom of Task Manager (or the Services button in Windows 7 Task Manager).
In Services click on the name column to sort the service alphabetically. Locate Windows Update. Select Stop the Service from the left hand column above description (or double-click on Windows Update to open the properties and click the Stop button, then click OK to close the properties).
Rename the \Windows\SoftwareDistribution\Download Folder
Using Windows Explorer rename the Download Folder in \Windows\SoftwareDistribution. E.g. bring up the context menu and select Rename call it something like Download-old. Windows will create a new Download folder when it needs it. The new Download folder will be empty until new Windows updates are available and are loaded.
On Windows 7 Restart the Windows Update Service
Windows will start the Windows Update service when it needs it. In Windows 7 select Start Service in Services or double-click on Windows Update and select the Start button, click OK to close the properties.
Delete the Renamed Folder
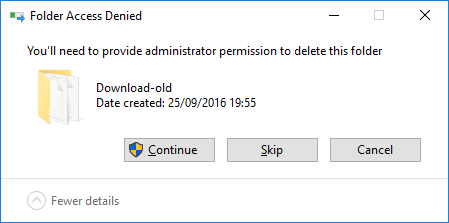
In Windows Explorer delete the renamed Download folder. For example if it was renamed Download-old then delete Download-old. Permission may need to be given to do this, if so click Continue on the message box that appears:

The Windows Update temporary Download folder, under the SoftwareDistribution folder, delete procedure has been completed.
See Also
- For a full list of all the articles in Tek Eye see the full site Index.
Archived Comments
Drew Meady on March 11, 2017 at 9:34 am said:
This was a very well worded, easy to follow and extremely helpful article. I’m glad I came across it, my problem was solved! Thanks!
Author:Daniel S. Fowler Published: Updated:


