Add a Simple List to an App
Lists are a basic building block of software. When writing applications getting a user to select an item from several options is a common requirement. Hence many frameworks have built in support for lists to make the programmer’s life easy, the Android SDK included. In this Android simple list example a Button on one Activity opens a second Activity with a ListView. The item selected in the ListView is returned to the first screen for display in a Toast message. This example does not use ListActivity but leaves the Activities extending AppCompatActivity for wider device and Android Studio compatibility.

(This Android list tutorial assumes that Android Studio is installed, a basic App can be created and run, and the code in this article can be correctly copied into Android Studio. Feel free to change data and names to meet your requirements. When entering code in Studio add import statements when prompted by pressing Alt-Enter.)
Start with a Two Screen App
Start with a basic two screen App, follow the tutorial Starting a Second Activity. Open the layout for the second screen (content_screen2.xml) and delete the TextView. Drag and drop a ListView on to the layout from the Palette. To view the source click the Text tab, it should look similar to this:
<?xml version="1.0" encoding="utf-8"?>
<RelativeLayout xmlns:android="http://schemas.android.com/apk/res/android"
    xmlns:app="http://schemas.android.com/apk/res-auto"
    xmlns:tools="http://schemas.android.com/tools"
    android:layout_width="match_parent"
    android:layout_height="match_parent"
    android:paddingBottom="@dimen/activity_vertical_margin"
    android:paddingLeft="@dimen/activity_horizontal_margin"
    android:paddingRight="@dimen/activity_horizontal_margin"
    android:paddingTop="@dimen/activity_vertical_margin"
    app:layout_behavior="@string/appbar_scrolling_view_behavior"
    tools:context="com.example.simplelist.Screen2"
    tools:showIn="@layout/secondscreen">

    <ListView
        android:layout_width="wrap_content"
        android:layout_height="wrap_content"
        android:id="@+id/listView"
        android:layout_alignParentTop="true"
        android:layout_alignParentLeft="true"
        android:layout_alignParentStart="true" />
</RelativeLayout>
Next the data for the list is created. Select app in the Project explorer and use the File or context (normally right-click) menu to select New then XML and Values XML File. Set the Values File Name to coffeelist, and click Finish. Add a string array for the items to be shown in the list, here a list of types of coffee:
<?xml version="1.0" encoding="utf-8"?>
<resources>
    <string-array name="coffeeMenu">
        <item>Filter</item>
        <item>Americano</item>
        <item>Latte</item>
        <item>Espresso</item>
        <item>Cappucino</item>
        <item>Mocha</item>
        <item>Skinny Latte</item>
        <item>Espresso Corretto</item>
    </string-array>
</resources>
These resources are added to a class called R by the SDK, this allows them to be access via getResources methods. Add the code to access the array. Using the Project explorer open the Java class for the Activity that will show the list (Screen2). Load the string array as the last line in onCreate, here coffeeChoices holds the string array, accessed via R.array:
String[] coffeeChoices = getResources().getStringArray(R.array.coffeeMenu);Declare the a ListView object, here called coffeeList, that will hold the instance of the defined ListView (the one dropped onto the Activity and inflated by the call to setContentView). Enter it as the first line of the Screen2 class (before onCreate):
ListView coffeeList;Set coffeeList to the ListView (after the coffeeChoices array assignment). Use the findViewById function casting the return to a ListView and passing in the ListView's id (look in layout files to find, or assign, id's):
coffeeList = (ListView) findViewById(R.id.listView); Each item in a list is in its own View layout, the whole list has many of these layouts duplicated for each item. This example is for a simple list and Android has predefined layouts for such lists, defined in android.R.layout resources. The predefined layouts have names such as simple_list_item_1, simple_list_item_2, simple_list_item_single_choice and others. See all the layouts in the documentation at http://developer.android.com/reference/android/R.layout.html, here simple_list_item_1 is used (a customised layout can be defined if required).
With the data loaded into coffeeChoices, and the View available via Android's simple_list_item_1 a code is needed to load the data into the View. To do that Android uses an Adapter class, which takes each item of data and creates the View to display it (and for simple_list_item_1 each entry in the ListView will be a TextView). The data is stored in an array so an Adapter subclass called ArrayAdapter is used. (For different data sources and other built in ListViews different Adapters would be required, see the documentation). The ArrayAdapter is instantiated with a reference to the Activity (this), the ListView (simple_list_item_1) and the data items (coffeeChoices). The ArrayAdapter is connected to the ListActivity using the setAdapter method. This code goes into the bottom of onCreate in the Screen2 class:
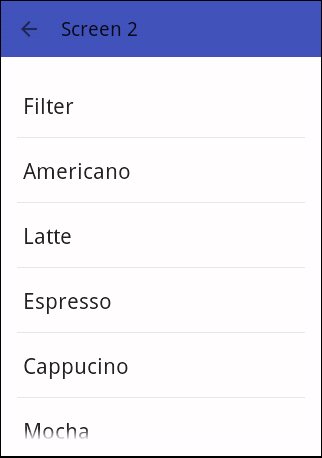
coffeeList.setAdapter(new ArrayAdapter<String>(this,android.R.layout.simple_list_item_1,coffeeChoices));Run the App to see check that the new code works and the list loads (if you have errors compare your code with the full listings at the end of the article):

The code to return a list item to the first Activity can now be added. Change the text on the first Activity's button to Choose Coffee (open the Activity's layout, select the Button and use the Properties to change the text).
Open up the code for the first Activity, MainActivity.java. Replace the call to startActivity with a call to startActivityForResult, here zero is being used as the request identifier:
startActivityForResult(intent, 0);An implementation of onActivityResult will capture the return from Screen2. The overridden function goes before the last closing brace (curly bracket) of MainActivity. It builds a Toast message to display the selected item, checking that the coffee order data has been returned:
@Override
protected void onActivityResult(int requestCode, int resultCode, Intent data) {
    if(data != null && data.hasExtra("Order"))
        Toast.makeText(this, data.getStringExtra("Order") + " ordered.", Toast.LENGTH_LONG).show();
    else
        Toast.makeText(this, "Nothing ordered!", Toast.LENGTH_LONG).show();
}
In the Screen2 code the setOnItemClickListener method for the coffeeList is called. This adds a class to watch for an item being selected, add this before the closing brace of onCreate:
coffeeList.setOnItemClickListener(new returnClickedItem());This inner returnClickedItem class overrides onItemClick. When called it provide access to the ListView's Adapter, the View clicked, its position in the list and the clicked View’s row id. These are used to access the clicked data, which is then sent back to the calling Activity via an Intent. Add the definition of returnClickedItem after final brace of onCreate:
class returnClickedItem implements AdapterView.OnItemClickListener {
    @Override
    public void onItemClick(AdapterView<?> parent, View view, int position, long id) {
        String item = (String) parent.getItemAtPosition(position);
        Intent data = new Intent();
        data.putExtra("Order",item);
        setResult(RESULT_OK, data);
        finish();
    }
}
Alternatively the common annoymous class could have been given to setOnItemClickListener:
coffeeList.setOnItemClickListener(new AdapterView.OnItemClickListener() {
    @Override
    public void onItemClick(AdapterView<?> parent, View view, int position, long id) {
        String item = (String) parent.getItemAtPosition(position);
        Intent data = new Intent();
        data.putExtra("Order",item);
        setResult(RESULT_OK, data);
        finish();
    }
});
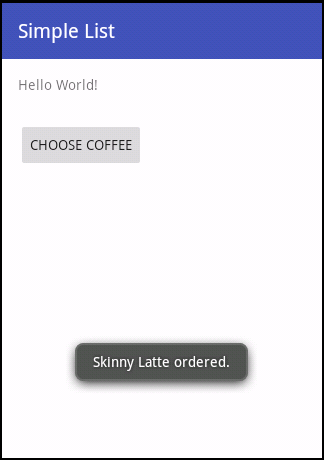
Now when the App is run selecting a list item on the second screen see it displayed in a message on the first screen:

The Class Code for MainActivity
package com.example.simplelist;

import android.content.Intent;
import android.support.v7.app.AppCompatActivity;
import android.os.Bundle;
import android.view.View;
import android.widget.Toast;

public class MainActivity extends AppCompatActivity {

    @Override
    protected void onCreate(Bundle savedInstanceState) {
        super.onCreate(savedInstanceState);
        setContentView(R.layout.activity_main);

        findViewById(R.id.button).setOnClickListener(new handleButton());
    }

    class handleButton implements View.OnClickListener {
        public void onClick(View v) {
            Intent intent = new Intent(MainActivity.this, Screen2.class);
            startActivityForResult(intent, 0);
        }
    }

    @Override
    protected void onActivityResult(int requestCode, int resultCode, Intent data) {
        if(data != null && data.hasExtra("Order"))
            Toast.makeText(this, data.getStringExtra("Order") + " ordered.", Toast.LENGTH_LONG).show();
        else
            Toast.makeText(this, "Nothing ordered!", Toast.LENGTH_LONG).show();
    }
}
The Layout for MainActivity
<?xml version="1.0" encoding="utf-8"?>
<RelativeLayout xmlns:android="http://schemas.android.com/apk/res/android"
    xmlns:tools="http://schemas.android.com/tools"
    android:layout_width="match_parent"
    android:layout_height="match_parent"
    android:paddingBottom="@dimen/activity_vertical_margin"
    android:paddingLeft="@dimen/activity_horizontal_margin"
    android:paddingRight="@dimen/activity_horizontal_margin"
    android:paddingTop="@dimen/activity_vertical_margin"
    tools:context="com.example.simplelist.MainActivity">

    <TextView
        android:layout_width="wrap_content"
        android:layout_height="wrap_content"
        android:text="Hello World!"
        android:id="@+id/textView" />

    <Button
        android:layout_width="wrap_content"
        android:layout_height="wrap_content"
        android:text="Choose Coffee"
        android:id="@+id/button"
        android:layout_below="@+id/textView"
        android:layout_alignParentLeft="true"
        android:layout_alignParentStart="true"
        android:layout_marginTop="27dp" />
</RelativeLayout>
The Class Code for Screen2
package com.example.simplelist;

import android.content.Intent;
import android.os.Bundle;
import android.support.v7.app.AppCompatActivity;
import android.support.v7.widget.Toolbar;
import android.view.View;
import android.widget.AdapterView;
import android.widget.ArrayAdapter;
import android.widget.ListView;

public class Screen2 extends AppCompatActivity {
    ListView coffeeList;
    @Override
    protected void onCreate(Bundle savedInstanceState) {
        super.onCreate(savedInstanceState);
        setContentView(R.layout.secondscreen);
        Toolbar toolbar = (Toolbar) findViewById(R.id.toolbar);
        setSupportActionBar(toolbar);
        getSupportActionBar().setDisplayHomeAsUpEnabled(true);

        String[] coffeeChoices = getResources().getStringArray(R.array.coffeeMenu);
        coffeeList = (ListView) findViewById(R.id.listView);
        coffeeList.setAdapter(new ArrayAdapter<String>(this,android.R.layout.simple_list_item_1,coffeeChoices));
        coffeeList.setOnItemClickListener(new returnClickedItem());
    }

    class returnClickedItem implements AdapterView.OnItemClickListener {
        @Override
        public void onItemClick(AdapterView<?> parent, View view, int position, long id) {
            String item = (String) parent.getItemAtPosition(position);
            Intent data = new Intent();
            data.putExtra("Order",item);
            setResult(RESULT_OK, data);
            finish();
        }
    }
}
The Layout for Screen2
<?xml version="1.0" encoding="utf-8"?>
<android.support.design.widget.CoordinatorLayout xmlns:android="http://schemas.android.com/apk/res/android"
    xmlns:app="http://schemas.android.com/apk/res-auto"
    xmlns:tools="http://schemas.android.com/tools"
    android:layout_width="match_parent"
    android:layout_height="match_parent"
    android:fitsSystemWindows="true"
    tools:context="com.example.simplelist.Screen2">

    <android.support.design.widget.AppBarLayout
        android:layout_width="match_parent"
        android:layout_height="wrap_content"
        android:theme="@style/AppTheme.AppBarOverlay">

        <android.support.v7.widget.Toolbar
            android:id="@+id/toolbar"
            android:layout_width="match_parent"
            android:layout_height="?attr/actionBarSize"
            android:background="?attr/colorPrimary"
            app:popupTheme="@style/AppTheme.PopupOverlay" />

    </android.support.design.widget.AppBarLayout>

    <include layout="@layout/content_screen2" />

</android.support.design.widget.CoordinatorLayout>
See Also
- Download simplelist.zip which has an instructions.txt on how to import the project into Studio.
- Change ListView Text Color in Android
- See our other Android examples.
- If a Rendering Problems message is displayed when viewing layouts see the article Android Studio Rendering Problems.
Archived Comments
Dharmil on July 8, 2013 at 7:47 am said:
Thanks for posting this, a very very helpful article. Made the concepts pretty clear.
Author:Daniel S. Fowler Published: Updated:


