A Swipe View Android Example for Screen Paging
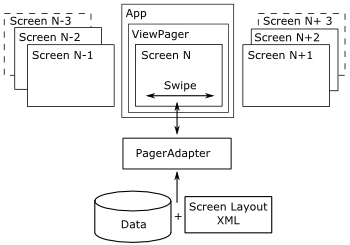
This introductory tutorial shows how to code a simple page swiping app with the ViewPager class. It is the basis for more complex view flipping examples, such as an image swiping gallery (to replace the Android Gallery widget that was deprecated in API 16). The ViewPager controls the swiping (flicking the screen left and right) between multiple screens or pages of data.

(This Android ViewPager swipe tutorial assumes that Android Studio is installed, a basic App can be created and run, and the code in this article can be correctly copied into Android Studio. The example code can be changed to meet your own requirements. When entering code in Studio add import statements when prompted by pressing Alt-Enter.)
Simple Flip View Tutorial Using ViewPager for the Android Screen Swipe Effect
The ViewPager is fed with the multiple screens by a PagerAdapter (or the sub-classes FragmentPagerAdapter and FragmentStatePagerAdapter).

The implementation of the PagerAdapter will create (and destroy) the pages to be shown in the ViewPager. It will load the pages with the data (such as text or images) that must be displayed on the individual pages. This tutorial's PagerAdapter allows swiping through a series of strings (text). The following steps are performed to complete the screen swiping demo:
- Start a new Android app in Android Studio.
- Add the ViewPager widget to the app's screen.
- Define the data (text) to be displayed on each swiped page.
- Define the layout for the swiped pages.
- Implement PagerAdapter which will create each page and load it with data.
- Test the app.
Start a New Android App
Start this tutorial by generating a new project in Android Studio, here it is called it Swipe Demo. (Alternatively add the page swiping effect to an existing App.) Use an Empty Activity with other settings left at default values. Update: The minimum Android API required for the ViewPager Support Library is now API level 9 (Gingerbread), or API level 14 (Ice Cream Sandwhich) if developing apps using Google AdMob for advertising.
The Support Library
The ViewPager is part of the Support Library. If not installed use the SDK Manager to download it (scroll to the bottom of the list of items in SDK Manager to find the Android Support Repository). See also Support Library Setup on the Android Developers website.
Adding the ViewPager Widget to the App's Layout
The ViewPager is referenced using it's package name of android.support.v4.view.ViewPager. (The v4 stands for the first API version that the original Support Library could be used on, but now it requires API level 9 or later.)
Here's the layout from this demo referencing the ViewPager. It is a RelativeLayout with a ViewPager below a TextView. Replace the activity_main.xml with code similar to this:
<?xml version="1.0" encoding="utf-8"?>
<RelativeLayout xmlns:android="http://schemas.android.com/apk/res/android"
    xmlns:tools="http://schemas.android.com/tools"
    android:layout_width="match_parent"
    android:layout_height="match_parent"
    tools:context="com.example.swipedemo.MainActivity">
    <TextView android:layout_width="wrap_content"
        android:layout_height="wrap_content"
        android:layout_centerHorizontal="true"
        android:textAppearance="@style/TextAppearance.AppCompat.Medium"
        android:text="@string/instructions" />
    <android.support.v4.view.ViewPager android:id="@+id/viewPager"
        android:layout_width="match_parent"
        android:layout_height="match_parent" />
</RelativeLayout>
Defining the Data to Show on Each ViewPager Page
In this example some text is shown on each swiped page. Here the strings are stored in an array. The array could be defined in code but here they are in a resource file. Open the strings.xml file and add a string array. We are using the code names for Android version releases, all named after desserts. Here is the strings.xml for the Swipe Demo:
<resources>
    <string name="app_name">Swipe Demo</string>
    <string name="instructions">Please Swipe</string>
    <string-array name="desserts">
        <item>Cupcake</item>
        <item>Donut</item>
        <item>Eclair</item>
        <item>Froyo</item>
        <item>Gingerbread</item>
        <item>Honeycomb</item>
        <item>Ice Cream Sandwich</item>
        <item>Jelly Bean</item>
        <item>Kit Kat</item>
        <item>Lollipop</item>
        <item>Marshmallow</item>
        <item>Nougat</item>
    </string-array>
</resources>
In the main class file, here called MainActivity.java, a string array is declared at the class level, String pageData[], and loaded from the resource in the onCreate method using pageData=getResources().getStringArray(R.array.desserts).
Create a Layout Used for the Swiped Pages
The swiped screen will display large text that has been centered. Using the Project explorer select the layout folder. Using the context menu (usually right-click) or the File menu select New. Then select Layout resource file. Enter the File name of page.xml. Enter RelativeLayout for the Root element, this will hold the centered text data. Click OK then add a TextView with the textAppearance attribute set to AppCompat.Large, give it an id of textMessage. The final layout XML for a page will be similar to this:
<?xml version="1.0" encoding="utf-8"?>
<RelativeLayout xmlns:android="http://schemas.android.com/apk/res/android"
    android:layout_width="match_parent"
    android:layout_height="match_parent">

    <TextView
        android:id="@+id/textMessage"
        android:layout_width="wrap_content"
        android:layout_height="wrap_content"
        android:layout_centerHorizontal="true"
        android:layout_centerVertical="true"
        android:text="TextView"
        android:textAppearance="@style/TextAppearance.AppCompat.Large" />
</RelativeLayout>
Implement PagerAdapter in the Java Class
The PagerAdapter will create and destroy the pages being swiped. In the MainActivity.java class, before the closing brace, create a new class, e.g. MyPagesAdapter, it needs to extend PagerAdapter and will require android.support.v4.view.PagerAdapter to be added to the imports. The new class implements four methods:
- getcount() – Returns the total number of pages and here it is simply the number of strings in the array so returns pageData.length.
- instantiateItem() – This is passed a reference to the ViewPager so the new page can be added to it, and the page number so that the correct data for the page can be loaded. In our implementation we use a class level LayoutInflater to create an instance of page.xml, and set the TextView to a string in the pageData array.
- isViewFromObject() – A method required by the ViewPager to check that a page matches the object from which it was created.
- destroyItem() – This is called when the ViewPager no longer requires the page (it is now several swipes away so can be cleared).
Here is the full MainActivity Java class with the PagerAdapter implemented:
package com.example.swipedemo;

import android.content.Context;
import android.support.v4.view.PagerAdapter;
import android.support.v4.view.ViewPager;
import android.support.v7.app.AppCompatActivity;
import android.os.Bundle;
import android.view.LayoutInflater;
import android.view.View;
import android.view.ViewGroup;
import android.widget.TextView;

public class MainActivity extends AppCompatActivity {
    String pageData[];          //Stores the text to swipe.
    LayoutInflater inflater;    //Used to create individual pages
    ViewPager vp;               //Reference to class to swipe views
    @Override
    protected void onCreate(Bundle savedInstanceState) {
        super.onCreate(savedInstanceState);
        setContentView(R.layout.activity_main);
        //Get the data to be swiped through
        pageData=getResources().getStringArray(R.array.desserts);
        //get an inflater to be used to create single pages
        inflater = (LayoutInflater) getSystemService(Context.LAYOUT_INFLATER_SERVICE);
        //Reference ViewPager defined in activity
        vp=(ViewPager)findViewById(R.id.viewPager);
        //set the adapter that will create the individual pages
        vp.setAdapter(new MyPagesAdapter());
    }

    //Implement PagerAdapter Class to handle individual page creation
    class MyPagesAdapter extends PagerAdapter {
        @Override
        public int getCount() {
            //Return total pages, here one for each data item
            return pageData.length;
        }
        //Create the given page (indicated by position)
        @Override
        public Object instantiateItem(ViewGroup container, int position) {
            View page = inflater.inflate(R.layout.page, null);
            ((TextView)page.findViewById(R.id.textMessage)).setText(pageData[position]);
            //Add the page to the front of the queue
            ((ViewPager) container).addView(page, 0);
            return page;
        }
        @Override
        public boolean isViewFromObject(View arg0, Object arg1) {
            //See if object from instantiateItem is related to the given view
            //required by API
            return arg0==(View)arg1;
        }
        @Override
        public void destroyItem(ViewGroup container, int position, Object object) {
            ((ViewPager) container).removeView((View) object);
            object=null;
        }
    }
}
The source code is also available in the text_swiper.zip file ready to import into Android Studio (also available from the Android Example Projects page).
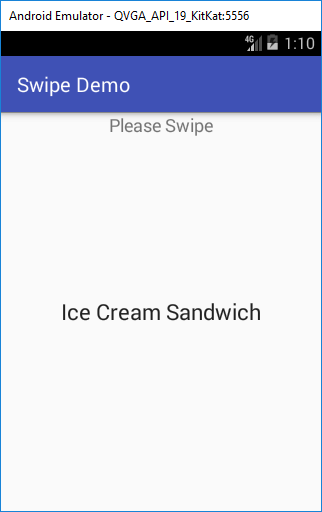
Test the Swiping by Running the App

This simple swiping App can be extended to support different types of data.
See Also
- See some more Android Example Projects.
Archived Comments
Ahmad on September 4, 2014 at 3:04 am said: Very useful and detailed. Thank you very much!
Dewan on July 14, 2015 at 6:23 am said: It’s so perfect! Thank you. This is helping me a lot.
Aelafseged on August 11, 2015 at 11:25 am said: So neat and to the point. I salute you for your Javaness!!!
Raul on November 9, 2015 at 8:47 pm said: Thank you very much! This is the first example that is simple and actually works!
Muhammad Mubeen on February 14, 2016 at 9:45 am said: How to create multiple swipe view? Can anyone help me please?
Christopher Geel in January 2018 said: Thanks buddy! This worked 100%
Author:Daniel S. Fowler Published: Updated:


