SeekBar Android Example Code and Tutorial
Understand how the SeekBar is used in an Android App. This tutorial provides some SeekBar Android example code for you to try out. This demo code for the SeekBar appeared in a pre-Android Studio API Demos app that came with earlier versions of the Android Software Development Kit (SDK).
(Up until Android API 17, Jelly Bean MR1, the Google Android sample code came as Eclipse projects. The API Demos project was one of them. From Android API 18, Jelly Bean MR2, the Eclipse projects became Legacy samples and a new set of Android Studio sample projects appeared. The Android samples are no longer shipped with the SDK. From Android API 24, Nougat, the samples are online and the legacy samples are only available if the older APIs are installed with the SDK Manager.)
The legacy API Demos app is very large and it can be difficult to find the sample code you need. Putting the SeekBar Android example here allows it to be easily seen.

(This Android SeekBar menu tutorial assumes that Android Studio is installed, a basic App can be created and run, and the code in this article can be correctly copied into Android Studio. The example code can be changed to meet your own requirements. When entering code in Studio add import statements when prompted by pressing Alt-Enter.)
ProgessBar That Can Be Dragged
The SeekBar is a useful User Interface (UI) control. It allows a user to easily vary an integer value simply by dragging left or right. Although for very large integer values you may not have fine control and a EditText may be a better option. For small values, such as a percentage, it is a good solution for providing a value setting interface.
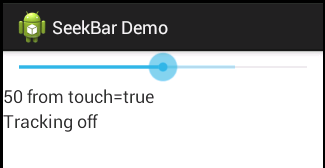
What Does an Android SeekBar Look Like?

The SeekBar Android Example Code
Start by generating a new app in Android Studio, here it is called SeekBar Demo. An Empty Activity is used with all other settings left at their default values. You can of course add the SeekBar to an existing app by adapting the code.
Either delete the default Hello World! and drop a SeekBar (given an id of seek) and two TextViews (given ids progress and tracking) onto the app screen, or replace the code, here in activity_main.xml, with the following:
<LinearLayout xmlns:android="http://schemas.android.com/apk/res/android"
    android:orientation="vertical"
    android:layout_width="match_parent"
    android:layout_height="match_parent">
    <SeekBar android:id="@+id/seek"
        android:layout_width="match_parent"
        android:layout_height="wrap_content"
        android:max="100"
        android:progress="50"
        android:secondaryProgress="75" />
    <TextView android:id="@+id/progress"
        android:layout_width="match_parent"
        android:layout_height="wrap_content" />
    <TextView android:id="@+id/tracking"
        android:layout_width="match_parent"
        android:layout_height="wrap_content" />
</LinearLayout>
There are three string values are added to strings.xml in the res/values folder. The full strings.xml now looks like this:
<resources>
    <string name="app_name">SeekBar Demo</string>
    <string name="seekbar_tracking_on">Tracking on</string>
    <string name="seekbar_tracking_off">Tracking off</string>
    <string name="seekbar_from_touch">from touch</string>
</resources>
Here is the Java code for the SeekBar for the MainActivity.java file.
package com.example.seekbardemo;

import android.support.v7.app.AppCompatActivity;
import android.os.Bundle;
import android.widget.SeekBar;
import android.widget.TextView;

public class MainActivity extends AppCompatActivity
        implements SeekBar.OnSeekBarChangeListener {

    TextView mProgressText;
    TextView mTrackingText;
    @Override
    protected void onCreate(Bundle savedInstanceState) {
        super.onCreate(savedInstanceState);
        setContentView(R.layout.activity_main);
        ((SeekBar)findViewById(R.id.seek)).setOnSeekBarChangeListener(this);
        mProgressText = (TextView)findViewById(R.id.progress);
        mTrackingText = (TextView)findViewById(R.id.tracking);
    }
    public void onStopTrackingTouch(SeekBar seekBar) {
        mTrackingText.setText(getString(R.string.seekbar_tracking_off));
    }
    public void onProgressChanged(SeekBar seekBar, int progress, boolean fromTouch) {
        mProgressText.setText(progress + " " +
                getString(R.string.seekbar_from_touch) + "=" + fromTouch);
    }
    public void onStartTrackingTouch(SeekBar seekBar) {
        mTrackingText.setText(getString(R.string.seekbar_tracking_on));
    }
}
This simple SeekBar Android example should be enough to get you up and running with the SeekBar in your App. The App should run without any errors. If it fails to run examine the error messages to find the fault.
See Also
- Download the code for this example, available in seekbar-demo.zip
- See the Android Developer page for the SeekBar class for more information.
- Android Example Projects
- For a full list of all the articles in Tek Eye see the full site alphabetical Index.
Author:Daniel S. Fowler Published: Updated:


