High Resolution App Icon for Google Play Publishing
When it comes to publishing your newly created Android app you will need to provide some graphics for use on the information page for the app in the Google Play store. Information on the types of graphics required can be found in the Play Console Help Graphics assets web page. One of the required graphics is the High Resolution Application Icon, this is a 512×512 32-bit Portable Network Graphics (PNG) file. The alpha channel is allowed therefore the actual visible image can be smaller, e.g. occupying 470×470 of the 512×512, if a drop shadow or border space was required.

Android Icon Generation
The article Launcher Icon Generator in Android Studio showed how app icons can be generated quickly. For refined control over the look of an icon a graphics program can be used. There are high quality free graphics tools available such as GIMP or Inkscape, or Paint.NET for Windows. The article Android Launcher Icons Using Inkscape showed how the high resolution application icons can be generated from an Inkscape image file. This tutorial is going to take the same image and add a rounded rectangle background to generate an enhanced version of an app icon for Google Play requirements.
Select the SVG Image to Use
To follow this example Inkscape needs to be installed and the Scalar Vector Graphics (SVG) file of the required image loaded. If Inkscape is not installed get it from the Inkscape website. Here the Cup of Coffee image from previous articles is used. There is a tutorial for the Cup of Coffee image, alternatively download it from OpenClipArt.org or grab a copy here.

Edit the Image in Inkscape
Open the image in Inkscape. To manipulate the entire image as a single entity group any component parts together. This involves selecting all the component parts (if not already grouped) with the Select All option off the Edit menu (or Ctrl-A) and selecting the Group command from the Object menu (or Ctrl-G). Select the Create rectangles and squares tool:

Click and drag from the top left of the image down to the bottom right, while holding down the Ctrl key to draw a square over the image. This is the basis for the background and it will be moved below the image when the border and colors have been set.

Drag one of the circles at the top right to create rounded corners on the square. Hold down the Ctrl key while dragging to make the corner radii equal on the vertical and horizontal.
With the basic rounded corner square box drawn the next steps are to determine whether it requires a border (and if so how wide), choose any required colors and set other effects like filters or gradients. A border can be applied by enlarging the stroke used to draw the square and giving it a different color from the squares fill color.

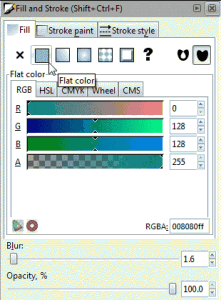
With the square selected open the Fill and Stroke dialog by clicking the Edit Objects icon on the Controls bar (or Shift-Ctrl-F).

On the Fill and Stroke dialog there are three tabs to access settings. The settings for color, gradient, blur and opacity for both fill and stroke can be changed. The stroke style can be changed, which includes the width. For the graphic used here the rounded square will have a border color different from the fill.
Choose two colors for the fill and stroke, for example set the fill to Teal (0x008080 RGB) and the stroke to Navy (0x000080 RGB). On the Stroke style tab set the Width to 20 px (pixels). The rounded square can be made more attractive by using a gradient or adding a filter, there are lots of predefined filters that can be used. Colors can also be set via the palette bar towards the bottom of Inkscape. If it cannot be seen use the Show/Hide option on the View menu and select Palette.)

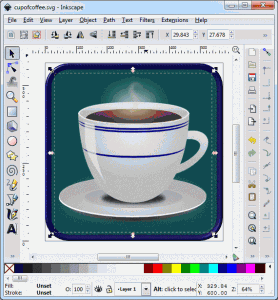
At this stage a colored square with a border has been drawn over the coffee cup image. Before applying a filter to the square to make it more attractive the underlying document size will be set to make exporting the PNG easier. The final document needs to be square to support the correct exporting.

With the rounded square selected make sure the width and height are equal using the W (width) and H (height) boxes on the toolbar (the width and height may be slightly out, if so edit the values to make them equal). The values do not need to be the same as the final icon size. The correct size is generated when the PNG file is exported. The width and height are the current object size and can be much larger or smaller than the final image. This is because Inkscape manipulates images as vector files which scale without loss of detail. After checking the squares dimensions open the Document Properties dialog via the File menu. With the rounded square selected click the Resize page to drawing or selection button (on the Page tab). Ensure that the Show page border checkbox is set (so you can see that the document matches the square).
With the rounded square selected use the Filters menu to apply an effect. Here the Button filter is applied from the Bevels filter option. (You could choose a different filter and also modify filter properties. Experiment with filters on another image to see what effects are possible. Note that some filters use a lot of processing power so may update the image slowly on older PCs). Applying the filter will increase the image size but the document boundaries will be the basis for the image export.

With the work on the rounded square completed make sure it is selected and click the Lower selection to bottom toolbar button (or use the End key or access the option via the Object menu).

With the coffee cup visible again select it, position it centrally (use the drag arrows to make any size adjustments). The final image is then ready for export.
Open the Export PNG Image dialog from the File menu. In the Width and Height boxes under the Image size option enter 512 (ignore the dpi boxes, they will change automatically). Enter a Filename or browse (Export As) to a location. Press the Export button. The image is now available for uploading when the app is ready for publishing.
The principles covered in this article also apply to the generation of the other graphic files required for App publishing. Inkscape can be used to design those files before exporting them to PNG files at the correct size. See also the article Grabbing an Android Device Screenshot on how to get hold of the screenshot images needed to publish an app.
See also
For a full list of the articles available on Tek Eye see the full site Index.
Author:Daniel S. Fowler Published: Updated:


