Starting Emulator Failed to Allocate Memory
Update: This article was produced for an older verison of the Android app development environment based upon Eclipse. Android apps are now developed in Android Studio. This article is now archived and provided for historical information only.
What to Try When The Android Emulator Reports A Memory Allocation Error
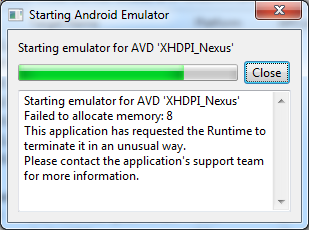
Occasionally when starting an Android Virtual Device (AVD) or running a project that starts an AVD in Eclipse an allocate memory error is reported. In the Starting Android Emulator dialog a message is seen similar to this one:
Starting emulator for AVD 'Name of AVD'
Failed to allocate memory: 8
This application has requested the Runtime to terminate it in an unusual way.
Please contact the application's support team for more information.
For example:

This article examines the reason for this error and possible solutions.
Why AVDs Need Large Amount of Memory
The latest Android devices now come with large memories, 1 GiB is now normal, and even larger memories will come in the future. When developing Apps for such devices it is natural to test them on AVDs that have the same specifications as the real world devices. When an AVD is set up using the AVD Manager program it is possible to choose existing device definitions. The Nexus 7 definition sets the RAM to 1024 MiB (1GiB). The RAM setting for the AVD is not all the RAM that the AVD uses. More RAM is required by the system to host and run the emulator code. An AVD given 1024 MiB can use up to 1.5 GiB when it is running. It makes having a high specification machine important when developing Android Apps.
Why AVD Memory Allocation Fails
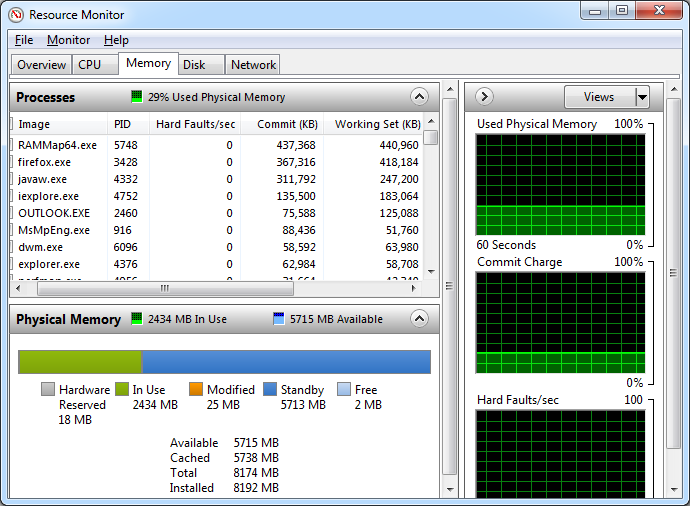
The Failed to allocate memory:8 error usually occurs because the AVD is configured to have a large amount of RAM (>768 MiB) and the host Operating System (OS) appears not to be in a position to allocate that amount to the AVD (remember it needs to allocate more than specified because of the overhead in running the AVD). The OS may have plenty of memory available but it seems it is not currently in a position to allocate such a large chunk. For example the following screen shot shows the memory status on a Windows 7 64 bit machine with 8GB of memory that displayed the above error when an AVD to emulate a Nexus 7 attempted to start:

This screenshot from the Windows Resource Monitor utility (perfmon.exe /res) shows virtually no free memory, but that is OK because there is plenty of Standby memory, 5.7 GiB. Standby is the memory cache and is available to newly starting programs (Windows will free cached memory when other programs need it). So why did the AVD fail to get a memory allocation? Although the memory was available the emulator code and Windows memory manager are probably not handling the situation where the Standby memory becomes fragmented. In that case Windows needs to clear and sort several page caches to fulfill the large request, this may not occur quick enough for the starting AVD, hence the allocation failure. When this happens there are several things that can be tried.
Solutions to the Failed to Allocate Memory AVD Error
There are several things to try to prevent the Failed to allocate memory:8 error, the reliability and effectiveness varies depending upon the specification on the machine. Here is a list of possible solutions starting with the most effective:
1. Reduce the AVD RAM Requirements
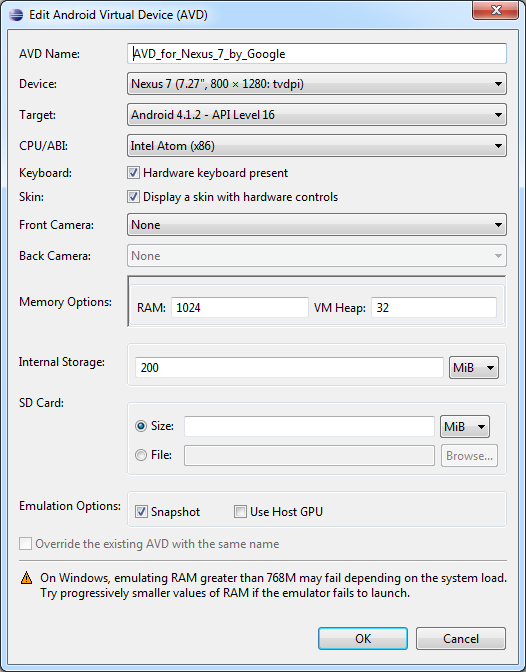
The simplest solution is to go into Edit Android Virtual Device (AVD) dialog and change the RAM setting to a smaller value (with the AVD Manager program open highlight the AVD that is not starting and select the Edit button):
For RAM values bigger than 768 MiB a warning box is displayed telling you of the likely failure. Hence drop it down to that value, it usually works (unless the PC does not have much physical memory). Using the lower value will not matter for most testing purposes. In fact it is likely to help with testing as many users never have the fall amount of RAM available anyway, so you are testing closer to real world scenarios.
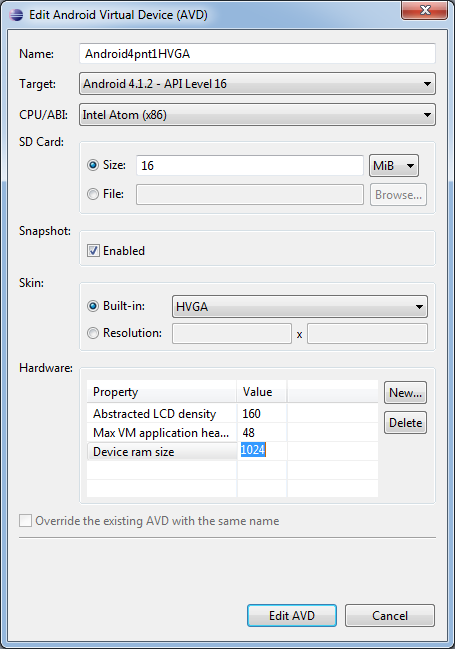
For some AVD configurations the edit screen may be different:

The RAM size is changed by editing the Device ram size value in the Hardware table and then saving it by pressing the Edit AVD button. The value of 768 MiB seems to be the sensitive memory size for Windows machines.
2. Reboot the PC
This flushes out the system memory and resets any Android Debug Bridge (ADB) and Emulator variables and paths that may have not reset correctly when the error occurred.
3. Close Any Open or Unused Applications
Free up more system RAM by closing anything that is currently running except for the programs needed to develop the Android software. Closing programs eases the stress on the Windows memory manager so it can better service requests for very large amounts of RAM. It has been shown that when the Failed to allocate memory error occurs closing unused programs can allow the AVD to start, that includes closing other AVDs running that are not currently used.
4. Invest in a Modern PC
If you are developing on a PC that is more than a few years old then you are probably struggling with the Android development cycle. A good development machine should be running a 64 bit Operating System with 4 GiB of memory as a minimum and a multicore processor. Such a machine allows for a faster code, test, debug cycle. The more physical memory the less chance of getting the Failed to allocate memory error when running an AVD.
5. Start a Different AVD then Revert to the One Giving the Error
Starting a lower specified AVD, closing it and then running the AVD that is giving the Failed to allocate memory error sometimes allows the failing AVD to run. It appears that successfully starting a AVD can reset some memory enough for the previously failing AVD to run.
6. Use a Physical Device
As a last resort you can simply use the actual device that is trying to be emulated. Of course you need to own the device.
Summary
When starting an AVD you can get a Failed to allocate memory: 8 if the RAM configuration for the AVD (or the overall memory requirements) are too large. Sometimes Windows cannot service the memory allocation request. To test you App when this occurs try the following:
- Reduce the RAM setting for the AVD to 768 MiB or less.
- Reboot the PC.
- Close any unused programs.
- Use a more powerful PC (64 bit OS with lots of physical memory).
- Open a different AVD, close it then open the failing AVD.
- Use a physical Android device.
See Also
- See the list of all the Android articles on this website in the site's index.
Archived Comments
Inu on April 1, 2013 at 12:54 am said:
Hmm...but what about CPU requirements?
If I have a single core machine that I want to dedicate to just the AVD, is that OK? Could I do that with a 1.5GHz CPU and do well?
Tek Eye on April 6, 2013 at 9:20 am said:
Using another PC for the AVD is one thing we have not yet done. Though others have had success doing so, see Remote Debugging with Android Emulator. There is no CPU requirements listed for the Android SDK but a 1.5 GHz PC CPU would be considered underpowered, you would need to try it to see how it performed. If the CPU supports virtualisation install HAXM and use a x86 AVD to boost performance.
Author:Daniel S. Fowler Published: Archived:


