Move Android Code Between PCs Running Eclipse
Update: Google no longer uses Eclipse as the development platform for Android. Google's preferred platform is Android Studio therefore this article is now archived and here for information purposes only. For an alternative export and import for Android Studio see the article Export Android Studio Project.
Importing, Exporting and Backing Up Android Code and Samples
It is useful to be able to grab the source code for an Android project so that you can send it to colleagues, upload it to forums, take a back up or move it to another machine. Simply zipping up the project in the Eclipse Workspace means that it will contain unnecessary files, files that have been generated by Eclipse and thus do not need to be included, only the actual source code is required (usually XML files, Java class files and graphics files). With the Eclipse Export and Import functionality only the files that are needed can be selected.

Add Your Own Android Samples
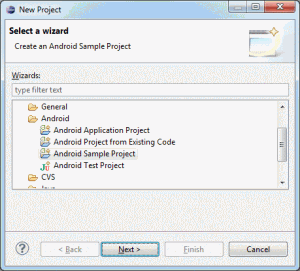
The Android SDK ships with a lot of sample Apps to help you find out how the Android APIs work (see a list of the samples in our article Use Android SDK Samples for Guidance). The samples are stored in API version specific folders under the directory android-sdk/samples, which can be found under the SDK install folder. There is a samples directory for most of the SDK Platform versions installed, you can use the SDK Manager to check which platforms are installed and if necessary add more. Generally the later the platform the more samples with more API functionality is available. The New Project wizard in Eclipse lets you start a new project from an existing sample. Using the Eclipse Export option one of your projects can be added to a samples directory.
Experiment with Moving Code Around
Play around with the Import and Export options to become familiar with them. Try it on an existing project, exporting to another machine set up for Android development, or use your existing development machine by setting up another Workspace. (To create another Workspace in Eclipse select Switch Workspace from the File menu, then Other…, then create and select the directory for the new Workspace. Eclipse will restart and open the new Workspace. If the ADT configuration screen displays again, there is no need to download the SDK, select the location of the currently installed SDK.) If you have not got a project to play with either load an existing sample, see our article Your First Android Java Program, or grab a project from our Android Example Projects.
In Eclipse the project that contains the files that require exporting or backing up must be selected in the Package Explorer and open. Select the File menu and then Export. In the Export dialog expand the General folder. When transferring code on the local network or machine use the File System option, alternatively to generate a Zip file select Archive File, good for uploading to forums, web sites and for back ups.
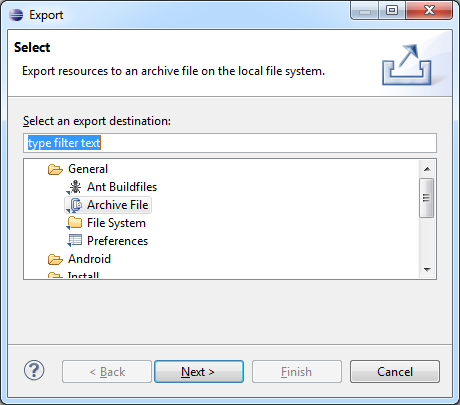
Select Next.
Selecting Files to Export
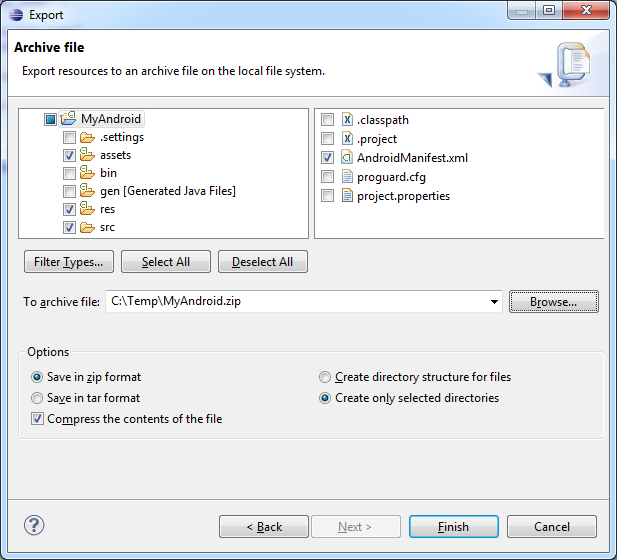
The dialog will show the project folders on the left and the files in the highlighted folder on the right. All the folders, and hence files, will initially be selected (ticked). Remove the selection from the top-level folder to clear all the selections. Then select the AndroidManifest.xml file in the top folder and select the assets, res, and src folders. Some projects will have other folders that need selecting, as the project developer you will be aware of which files you have created.
File System Export
Chose the directory for the export, if exporting to another machine on the same network chose a shared folder. If the directory chosen for export is one of the directories under the SDK samples directories then the project becomes available in the Android Sample Project wizard when starting a new project (the directory name is shown in the list of samples). Click Finish and the selected files will be copied to the given directory.

Archive File Export
For a Archive File export chose the Create only selected directories option. This puts the files at the root of the Zip file and this is suitable for importing back into Eclipse using the Import and Archive File option.
Android Project Code Import
Once a directory or zip file is available with the exported source code you have three options to import back into Eclipse.
- Import into an existing project.
- Generate a new project from the directory (for a zip file extract the files first).
- Generate a project from a sample (the files must have been exported to a sample directory).
Import into an Existing Project
This is a useful option if you already have a project but want to add several files from another project to it. Alternatively use it to create an entirely new local fork of an existing project, maybe to experiment with new ideas. In Eclipse select the existing project in the Package Explorer and ensure it is open. Alternatively generate a new project (see the article Your First Android Program to see how). If you intended to create an identical project to the import one then the existing project should have the same Application Name, Project Name and Package Name when entered on the New Android Application dialog. If in doubt look at the AndroidManifest.xml and the directory structure under the src folder in the exported files to find the required names. For example a Java file stored in src/com/example/main would have a Package Name of com.example.main. You can also uncheck the Create activity option if you are importing the Apps start-up activity code.
File System Import
With the new project selected in the Eclipse Package Explorer select the Import option from the File menu. Select File System under General on the Import dialog then select Next. Browse to the directory containing the exported files. Make sure all the required files are checked for import. Check the Overwrite existing resources without warning box to prevent messages about files being overwritten. (If you want to see what is overwritten leave it unchecked.) Click Finish.

Archive File Import
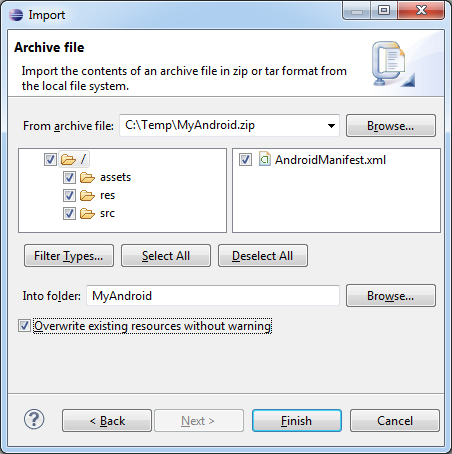
Similar to the File System import, except on the Import dialog select Archive File, then select Next. Browse to the directory containing the Zip file and select it. All the files will be checked for import. Here we assume items are at the Zip file's root. Click Finish.
Generate a New Project from a Source Directory or Sample
Source files that have been exported using the File System option, or source that has been extracted from an Archive File to a directory can be imported into Eclipse using the New Project Wizard. Select File from the main menu and then Project under Android select either Android Project from Existing Code or Android Sample Project.
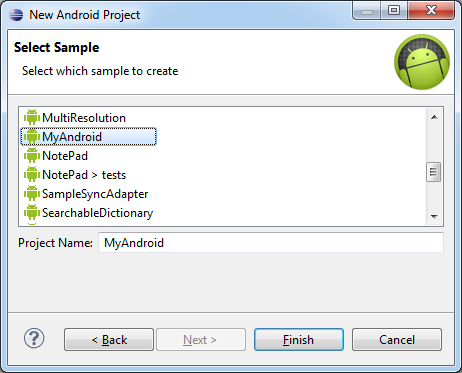
After selecting Android Sample Project and then Next select the API for the samples. For example if the directory is in the samples/android-7 folder then select Android 2.1 target (API Level 7). Select the sample (the name of the exported project) and click Finish. A new project is created with the same name as the sample in your Workspace. The files are copied from the samples directory to your Workspace.
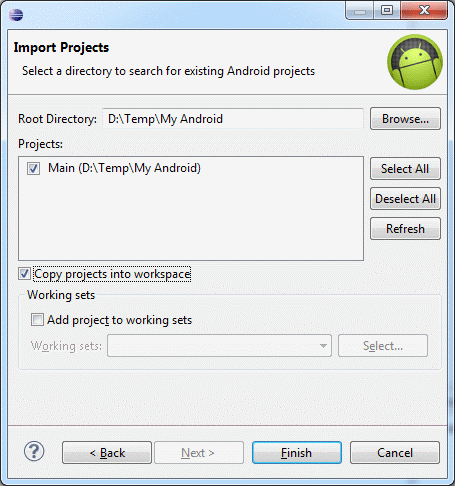
If selecting Android Project from Existing Code browse to the location of the exported (or unzipped) directory. The directory will be scanned for projects. Files suitable for generating projects will be listed, with names based on the starting Activity. Ensure only the required project is checked. Also check the Copy projects into workspace option so that the code is moved to your Workspace. Click Finish to create the project.
Correcting Import Issues
With the files imported the project should compile and run. If the message Could not find MyAndroid.apk! (whatever the project is named) is shown in the console confirm the Launch Configuration. With the project selected in the Package Explorer use the File menu to select Properties. Select Run/Debug. Select the project name and click the Edit button. Click OK to close the dialog. The project should now run. If not Eclipse should show any errors that need addressing.
During the import a message box with the title Launch Configuration Update may appear. It is likely to display The package definition in the manifest changed. Do you want to update your Launch Configuration? Select Yes. The Package Name selected for the new project is likely not to match the Package Name in the files being imported, probably due to a typing mistake or case difference when naming the package. This can be checked when the files have finished importing. Open AndroidManifest.xml and make a note of the package attribute on the manifest element. Check that it matches the package name under the src folder in the project tree. Check the Launch Configuration as described in the previous paragraph. Either Launch Default Activity is selected or Launch is set to the correct starting Activity in the correctly named package. Make any changes that are not correct, use the Refactor option on the File menu to rename a package.
Summary
- Use the Export option to copy source files to the file system or a Zip file.
- Export can be used to add to the default samples.
- Us the Import or New Android Project options to create a project based on exported code.
Moving an Android project to another installation is straightforward enough. A future post will show how this can be done using Git, the file version control system.
Author:Daniel S. Fowler Published: Updated: Archived:


