Free Up Disk Space on Windows with a Disk Cleanup
Tips to free up disk space on Windows PCs and devices. These disk cleanup pointers apply to the latest Windows versions, from Windows 10 through Windows 8.1, Windows 8 and Windows 7. Some tips apply to older versions of Windows. With the use of Soild State Drives (SSDs) in new computers the amount of free disk space is generally lower than it used to be, especially as music and films are going all digital. This means that low disk space messages can occur, particularly on cheaper devices. This article provides a list of ways to cleanup Windows and recover space that has been taken up by clutter. Time to sweep away that disk clutter, but please remember to always keep a backup of important files and documents.
The Importance of Backups
The most valuable part of the computer is all the pictures, files, documents and media (such as music) that has been collected over the years. Copies need to be kept safely on another device (such as a thumb drive or external backup disc) or at another location. An online drive such as OneDrive (previously SkyDrive), Google Drive or Dropbox helps in this situation. It is important to think about Data Recovery and the Three Golden Backups rule. Always ensure your digital assets are regularly backed up. Especially before performing an intensive disk clean-up.
Disk Cleanup to Solve Low Disk Space Messages
One day the PC is running OK, then out of the blue there are warning messages popping up. Sometimes these messages appear after installing a new program, or downloading a film from iTunes, or after a Windows Update. Sometimes the messages or low disk space notifications just start appearing for apparently no reason. What types of messages will you see?
List of Low Disk Space and Similar Messages When The PC is Running
Here is a list of some of the typical messages that can be seen (and they usually come with a PC that starts running slower):
- Low Disk Space.
- Windows – Out of Virtual Memory.
- Your system is low on virtual memory.
- Your computer is low on memory.
- Not enough storage is available to complete this operation.
- There is not enough free disk space to run Steam.
- There is not enough space to install these option(s).
- There is not enough space on target drive while attempting to copy files.
- There is not enough space on the disk.
- There is not enough free disk space to extract the installation data.
- There is not enough space on the Local Drive.
- Close programs to prevent information loss.
What they generally mean (though not always) is that the PC's hard disk is nearly full up. If the hard disk gets completely full the computer will slow down and may not boot up correctly on next use. You may need to use a Windows boot disk or recovery disc to boot the system and free up some space.
Perform a Disk Cleanup to Free Up Disk Space
There are several disk cleanup tasks that can be performed. Once done the hard disk with be OK for a short while. However, a longer term solution will be required. Sometimes just reorganising the layout of the computer's files will sort the issue. Sometimes it will be worth adding a new hard disk to reduce the problem in the future.
Accessing Control Panel in Windows 10 and Earlier Windows Versions
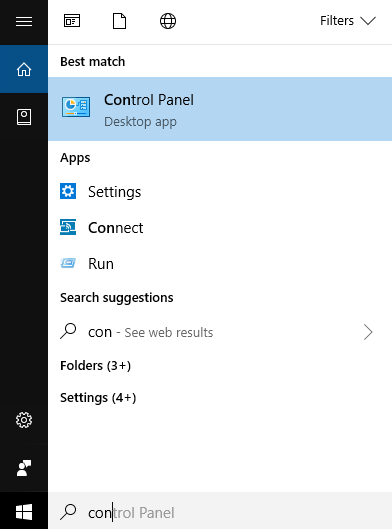
You will also need to access the computer's Control Panel. On Windows 10 or Windows 8.1 at the Start screen or in the search box start typing con and Control Panel will be listed for selection. In Windows 7 and earlier access Control Panel via the Start button.
Use the Administrator Account for a Disk Cleanup
Let's start the disk cleanup. You need to be logged on as a computer Administrator (a.k.a. admin) to perform many of these cleanup tasks. If several users have accounts on the computer then log in with one that has local Administrator rights (usually the first account created when the computer was first set up).
(It is recommended that day-to-day computer usage is not performed under an Administrator account for security reasons. If it is your computer, laptop or device always have two users, one for administrator tasks, such as installing software, and one for everyday normal use.)
If you do not have an admin account only some of the following tasks can be performed. If someone else controls the computer ask them to perform the cleanup, or get them to create a device Administrator account for you to perform the cleanup. However, remember that admin rights can be misused, this can leading to problems with the device. Running a device while logged on as an Administrator can make it easier for malware to be installed when connected to the Internet.
Empty the Recycle Bin
If there are items in the Recycle Bin, located on the desktop, empty it. Look at the Recycle Bin icon on the desktop and if it looks like it has paper in it, then it has items in it. If required open the Recycle Bin (double-click) to check the contents before deletion. Bring up Recycle Bin's context menu (usually right-click) and select Empty Recycle Bin. A message may be displayed to confirm the permanent deletion.

Delete the Contents of the Windows Temporary Folder
Computer software, such as installers, apps and other programs, will sometimes generate temporary files when running. Once the files are finished with they should be deleted by the software that generated them. Sometimes they don't get deleted or the software crashes before the temporary files are deleted. If the software generated the files in the correct temporary location, either C:\Windows\Temp or in the logged on users AppData area (AppData\Local\Temp), then these directories can be emptied.
(Sometimes the temporary directories are moved. To check their location view the systems environment variables. Type env in the search box and select Edit the system environment variables, or in Control Panel open System and Security then System, select Advanced system settings. On the Advanced tab select Environment Variables. The location for temporary files is stored in the TEMP and TMP variables for the user and the system, i.e. there are two types of temporary directories. TEMP and TMP normally point to the same place but can be set differently. User and system TEMP/TMP are normally different, but again can be set to the same location. For the user settings they will normally show the Temp directory under the logged on users AppData\Local location, e.g. C:\Users\John Doe\AppData\Local\Temp. For the system settings they with normally show C:\Windows\Temp)
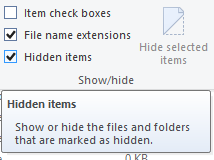
Close any running programs before cleaning the temporary directories. Using Windows File Explorer go to C:\Windows\Temp (or the location determined by the TEMP/TMP system environment variables). You may need to turn on Hidden items in Explorer using the View menu.
Delete all the contents of C:\Windows\Temp (you may need to give permission to do so). Some files and directories will not delete if programs or services are still using them (choose skip when the warning comes up).
Open your user's program data folder. Either through C:\Users (e.g. C:\Users\John Doe for a user named John Doe), or the desktop will have a folder icon named after the user. Again with Hidden items enabled, in Explorer browse to AppData\Local\Temp (or the location determined by the TEMP/TMP user environment variables), e.g. C:\Users\John Doe\AppData\Local\Temp. Delete all the contents. Some may fail to delete because they are still in use (choose skip when the warning comes up).
If the computer has another hard disk with plenty of free space the TEMP and TMP directories can be changed to use the different disk. Change the TEMP/TMP environment variables settings to a location on the other disk. E.g. create a TEMP directory on another hard disk, change the TEMP and TMP variables via Control Panel to point to the new directory. For example if created on a D: drive it would be changed to D:\TEMP. Restart the computer for the change to take effect. Programs will use the new location for temporary files.
(Warning: A few programs will still use the default TEMP/TMP locations because of hard coded settings, including some Microsoft installers. So don't forget to clear the C:\Windows\Temp and the user's AppData\Local\Temp directories occasionally.)
Clear Web Caches and Move Them to Another Drive
For all the installed web browsers clear their caches. If the PC has another hard drive the cache locations can be moved to the other drive to help prevent low disk space issues in the future. The article Clear Web Cache and Moving Browser Cache Folder shows how to delete the web cache for the Edge browser, Google Chrome, Mozilla Firefox, Opera and Internet Explorer.
Remove Unused Programs, Apps and Bloatware (Manufacturer Installed Software)
Remember if you never use a program and app it still takes up disk space. Open Apps and features in Settings (search for apps), and in Control Panel, under Programs select Uninstall Program. For each program or app no longer, or never, used, select it and select Uninstall. Only remove programs you are sure about as some will be needed by the system and some used by other programs. Research the program online if unsure. If in doubt leave it installed.
Turn Off Windows Features
Using Programs in Control Panel select Turn Windows features on or off. Uncheck anything not used, however, it is likely that only advanced users will know what features can be turned off. Research online if unsure, and if in doubt don't change the settings. Windows is much better these days at not installing unnecessary features, but it is worth checking.
Delete Old Folders, Documents, Photos, Videos and Music
Using your chosen media player, e.g. Windows Media Player, Microsoft Groove, or iTunes), delete any media no longer required. Use Windows File Explorer to view the contents of the logged on user's files. Delete any item (folders and files) no longer required.
Clear Out the Offline Email
If you email is stored on the computer and not the Internet mail server, then browse all the items and delete anything not required. Do this in the email program.
Remove Old Users and Their Files
You will need to be logged in as an Administrator to delete other user accounts. Make sure any data stored under old user accounts is no longer required (if so copy it to another account or to offline storage, see the section on backups at the star of the article).
In Control Panel under User Accounts and Family Safety select Add or remove user accounts. Select the account to remove. Click Delete the account. When asked if files should be kept select Delete Files to recover the space used by the account (but only if you really no longer require the files, otherwise backup the files first). Select Delete Account to confirm. The user account and all its files are removed.
Ensure Windows is Up To Date
Windows is updated regularly to improve security and reliability. This update process uses and creates temporary files. To delete these files first make sure all the latest updates have been installed. Otherwise updates that have been downloaded but not installed may be removed during the clean up process. (If this occurs they will be downloaded again at the next update.)
In Windows 10 select Settings then Update & Security, or start typing Update in search and select Windows Update Settings.

(In Windows 7 use Windows Update via Start and All Programs. In Windows 8 and 8.1 type Settings at the Start screen and select PC Settings, then Update and Recovery. Or in Control Panel enter Update in the search box and select Windows Update.)
Ensure it says that Your device is up to date otherwise select Check for updates or Check now to ensure that No updates are available. Otherwise Install Updates. The Windows Update may fail if there is not enough space to install the update. Sometimes installing updates one-by-one (oldest first) can overcome update errors. Also doing a reboot can fix an update issue. Otherwise finish this list of disk cleanup tips and then try performing a Windows update again.
Run the Disk Cleanup Program
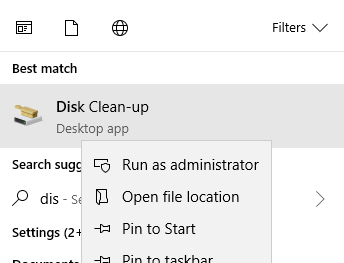
Windows comes with a Disk Cleanup utility that is automatically run once in a while. However, it can be run to clean up additional system files. On Windows type Disk in search or at the Start screen and select Disk Clean-up, or the option that starts Clear Disk Space. On Windows 7 start Disk Cleanup by selecting it via Start, All Programs, Accessories and System Tools. Use the context menu (normally right-click) to run Disk Clean-up as administrator for the full range of options.
Note that when Disk Cleanup is performing the work it can take some time to complete. You may need to plan to leave it running for a while.
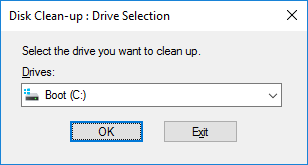
Select the drive to clean up, i.e. the one low on space, probably the C: drive. It will do a scan to determine files to cleanup. When the Disk Cleanup dialog displays select the Clean up system files button. Select the drive again and another scan is performed. Now a More Options tab is available. On the More Options tab select Clean up in the System Restore and Shadow Copies area. Confirm deletion of all but the last restore point by selecting Delete to the displayed question.
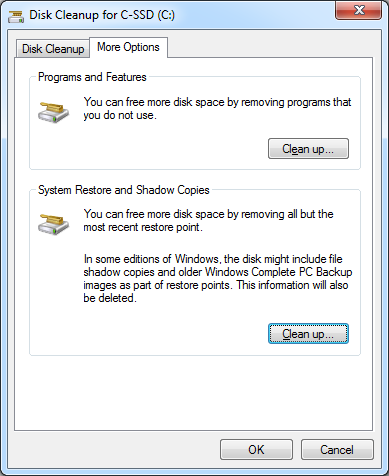
Click the OK button to perform the clean up of the items listed on the Disk Cleanup tab.
Sometimes the Disk Cleanup utility can appear to hang. It after a few hours it has not completed restart the computer. Continue with the remainder of these tips and return to Disk Cleanup after the other steps have been completed.
Run a Cleanup Utility
A dedicated third party cleaner, such as Piriform's CCleaner (Computer Cleaner) can be used, will detect other files to clear. Running a utility like CCleaner can help remove unwanted files (the free version is good enough, the annually paid version adds extra features and support) .
Clear the SoftwareDistribution Download Folder
If Windows Update is complete (see the Ensure Windows is Up to Date section earlier). Some of the files used by Windows Update but no longer required may still be left around. These can be removed to free up disk space. This is covered in the separate article SoftwareDistribution Folder Delete in Windows.
Clear the Prefetch Folder
Every time Windows starts, every time the same program is run, Windows loads the same program files again and again. Knowing this Windows bundles those files together in a cache called the Prefetch Folder. This folder is updated automatically by Windows. However, if disk space is really tight, and you have removed some recently used programs, you may free a little more space by deleting the contents of Prefetch. Windows will recreate the Pretch folder when the computer next runs. The small downside to deleting the contents of the Prefetch folder is that Windows start up and the running of some software will be slower than normal until the new Prefetch files have been automatically recreated.
To delete the contents of the Prefetch folder open up Windows Explorer, click on the Windows directory (normally C:\Windows). Find the Prefetch folder (C:\Windows\Prefetch). Select all the files in the folder (use Ctrl-A) and press delete. Restart the computer. (New prefetch files will be created as the computer is used). Windows automatically manages the Prefetch folder so clearing it is only required if disk space is extremely low.
Delete System Dump Files and Change the Creation Location
Windows can crash because of a hardware or software fault, or loss of power. When this happens Windows can create dump files that may be sent to Microsoft (to help diagnose faults). A dump file is literally a dump of the state of computer at the time of the crash. There can be a MEMORY.DMP file in C:\Windows, and in C:\Windows\Minidump a series of dump files for each crash that occurs (if Windows got the chance to create the file). Note that depending upon dump settings and the nature of the crash either MEMORY.DMP or the mini-dump files may or may not be created.
If you do not need to analyse the cause of a crash the dump files can be deleted (if not already deleted by Disk Cleanup or a third party cleaning tool). Using Windows Explorer see if MEMORY.DMP is in C:\Windows and if so delete it. Go to C:\Windows\Minidump and select all the files and press delete.
If required the location that the dump files are created can be changed. If space on the system disk is tight move the location to a disk that has more space. In fact MEMORY.DMP will not be created if the system disk is low on space. If this is the case, and the PC is crashing often, then change the dump file location. This will give the opportunity for analysis of the dump file at a later date.
Use Control Panel to open System and Security and select System. For the left hand list select Advanced system settings. On the Advanced tab under Start-up and Recovery select the Settings button. On the Start-up and Recovery dialog change the dump file location in the Write debugging information section. E.g. if a D:\TEMP directory existed on a machine (and the D: drive had lots of free space) the Kernel memory dump could be changed from %SystemRoot%MEMORY.DMP to D:\TEMP\MEMORY.DMP. The same applies for the other dump file options. Restart the computer if changes are made.
Move Personal Folders to Another Drive
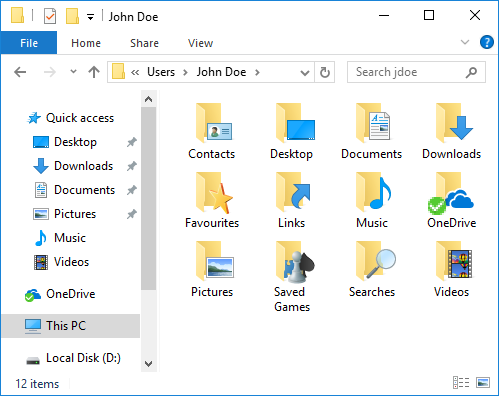
The personal folders of the PC's users are on the same drive as Windows by default. For PCs with multiple drives the personal folders (Documents, Music, Video etc.) can be moved to a hard disk with more room. The process is easily done with Windows Explorer. With Windows Explorer open, locate the personal folder for the logged on user (e.g. Documents, Music, Pictures etc.), open the context menu (usually right-click). Select Properties. On the Location tab enter the new location (on a different hard drive with plenty of space) and click OK. Select to confirm creation of the new location and select Yes to confirm moving of the files. Full details on moving personal folders is in the article Move Documents and Other Personal Folders in Windows.
Move the Page File
A powerful PC may have 8GB or 16GB or RAM (memory). Less powerful computers may use a disk file call the Page File to simulate more memory, known as virtual memory. The page file (pagefile.sys) is on the system drive by default. If the computer has another drive (and a bonus if it is a faster drive), the page file can be moved to the other drive. This can save space on the system drive. To change the page file location use the Advanced systems settings (in Control Panel open System and Security and select System. For the left hand list select Advanced system settings.) On the Advanced tab under Performance select the Settings button. Select the Advanced tab on the Performance Options dialog. In the Virtual Memory section select the Change button.
On the Virtual Memory dialog select a hard drive with free space, ideally the fastest drive in the system. (Uncheck the Automatically manage paging file size for all drives.) With the required drive selected choose the System managed size option (Windows sizes the page file as required). Click OK to close the dialog boxes, a system reboot will be required.
Move Installed Programs
If programs are no longer required they can be removed. For programs that are still used, and the install media is still available (or can be obtain via an Internet download), they can be re-installed. When re-installed instead of selecting the normal install location of C:\Program Files or C:\Program Files (x86) choose a drive with plenty of space and create a programs directory on it. E.g. D:\Programs. When a software installer runs some of them allow the install location to be selected (sometimes directly or via a Customize button). Change the install directory to a sub-directory in the new Programs directory (you may have chosen a different name for the alternative programs directory).
Run a Cleanup Utility Again
After performing the above clean up tips run a third party clean up tool again. It may find other items that can be deleted (e.g. files left over when a program is moved to a new drive).
Defragment the Drive (Does not Apply to Solid State Drives)
A hard drive is made of many thousands of sectors. When files are saved to a hard drive they are saved into the sectors. Sometimes the free sectors are next to each other. Some times they are spread out. This means a file can also be spread out. A sector may not be fully used up by a file as well. This means a drive may have lots of sectors with parts of files, and lots of sectors partially filled with parts of files. This is known as fragmentation. A defragmentation utility will rearrange files and parts of files to use the sectors more efficiently. This can free some disk space. This does not apply to Solid State Drives (SSDs) as they use a different technology to store data.
On Windows defragmentation is done automatically at regular intervals. However, sometimes it needs to be run manually. In Windows from the Start screen or in the search box start typing defrag then select the Defragment and Optimise Drives option. In Windows 7 from the Start button select All Programs then Accessories and the System Tools. Select the Disk Defragmenter utility. Run the utility on hard disk drives (not SSDs) that show a percentage of fragmentation that is at least double figures. The utility can take some time to complete, so it is be best to do it when the computer or device is not being used.
Use a Third Party Defragmentation Utility
There are different defragmentation algorithms. Therefore a different defragmentation utility may free up a little more space. Try one if necessary, such as the Piriform Defraggler.
Turn Off Windows Hibernation and Delete the Hibernation File
Windows supports a hibernation mode, the system can restart quicker from a power off state if hibernated. To do so the running configuration is stored in a file C:\hiberfil.sys. This can be almost as large as the amount of memory the machine has (e.g. 8 GB). If all the clean up options have been tried and space is still needed turning off hibernation and removing the hiberfil.sys file can free up desperately needed space. This is done via an administrators command prompt with powercfg.exe -h off. See the article hiberfil.sys Windows Delete to Free Up SSD Space for full details.
Install a New Disk
If a lot of the above steps could not be completed, because there is only one disk drive in the machine, consider adding a new hard disk. There are lots of tutorials online showing how to add a disk to a computer, alternatively someone you know can probably help, or knows of someone to help, you install a new disk. Adding another hard disk or SSD is reasonably easy. Once another disk has been added run through the above list again.
Backup Data and Refresh (Reset) Windows
If you still cannot find enough disk space, and cannot install a new disk, then more drastic options may be required. Such as resetting or re-installing Windows, getting Windows back to a clean state. However, this means a backup of all your files, documents and media (such as music) needs to be kept safely on another device (see the backup section at the beginning of this article). Even though the reset option allows the choice to keep existing files, it is important to always have a backup in case anything goes wrong.
If Windows is reset or reinstalled you will need to re-install any programs that do no come with Windows. Therefore, make sure the install media is available, or the installer for a program can be downloaded. Plus ensure any required serial numbers for installers are available.
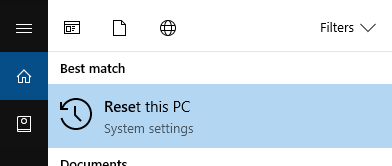
If you have taken a backup of all important files, and have installers ready for other required programs, then the reset process can be started. In the search box or at the start screen type reset and select the Reset this PC option. Select Get started and follow the prompts. Windows will be returned to its starting state.
Reformat the Hard Drive and Re-install the Operating System
The last option is reformatting the disk and reinstalling Windows. You may need the original Windows operating system install media or CD, or be able to download the Windows installer from Microsoft. Again if not sure how to do this find someone who can help or research online. Reinstalling Windows usually has no option to preserve existing data (unless the files have been moved to a different disk). Therefore, all the advice about having backups, as for the previous section on performing a Windows reset, applies.
The computer, laptop or device manufacturer usually provides instructions on reinstalling the operating system. They sometimes provide a support section on their website. Plus having access to another Windows device is important when reinstalling an operating system, in case anything needs to be downloaded if the reinstall goes wrong. If in doubt seek help from friends and family who understand the process.
And Finally
Some useful PC utilities are available to help maintain a computer on the Internet, but make sure you don't install fake utilities which only pretend to clean your PC but actually install malware, i.e. resist clicking on links in adverts and go straight to a respected companies website.
Running low or running out of disk space can cause a PC to grind to a halt. However, by performing a disk clean up to free up disk space normal service can be resumed. This article has provided a few tips on how to achieve that. Sometimes the tips in this article need to be performed more than once for the best disk cleaning results.
See Also
- For a full list of all the articles in Tek Eye see the full site Index.
Author:Daniel S. Fowler Published: Updated:


