Context Menu Example for Android
This tutorial provides an Android context menu example, using the aptly named ContextMenu class. On a Windows PC system the context menu is sometimes referred to as the right-click menu. (Though using this term is not recommended in case the user is left handed and has switched the mouse, in which case the context menu requires the left-click!)

(This Android context menu tutorial assumes that Android Studio is installed, a basic App can be created and run, and the code in this article can be correctly copied into Android Studio. The example code can be changed to meet your own requirements. When entering code in Studio add import statements when prompted by pressing Alt-Enter.)
Take Your First Steps in Implementing Context Menus in Android
A context menu is a menu of options that apply to the item immediately under the pointer (mouse or finger). The parts required to implement a simple context menu are:
- Define the menu captions, usually in a string resource file.
- Define the menu layout in an XML file.
- Tell Android a View is using a context menu.
- When the context menu is requested show it.
- React to the selected menu item.
The example code presented here is going to call the setColorFilter method of an ImageView using a context menu. This will be used to add a basic image effect to a bitmap graphic by applying a red, blue or green filter. Start by creating a new project in Android Studio, here called Context Menu.
Define Menu Captions
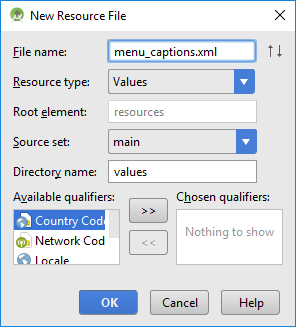
The menu captions are simple string resources. In Android Studio use the File menu (or Studio's Project explorer context menu) then New and Android resource file (or Values resource file). Call the file something meaningful, such as color menu_captions.xml, and click OK.

Add four strings with the values Red, Blue, Green and Clear. You will have a file similar to this (alternatively the values can added to the existing strings.xml file):
<?xml version="1.0" encoding="utf-8"?>
<resources>
    <string name="red_option">Red</string>
    <string name="blue_option">Blue</string>
    <string name="green_option">Green</string>
    <string name="clear_option">Clear</string>
</resources>
Define the Menu XML
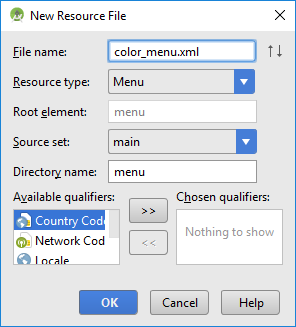
In a similar way to the first step create a new resource file. This time the Resource type is set to Menu. Name the new menu file appropriately, such as color_menu.xml, click OK. (The file is creared in a res/menu folder.)

Add Menu Item four times from the Palette, setting the title to each caption string and giving each item an id. The menu file has a menu element at the root and an item element for each menu option required. Each item has an id and title (the title points to the captions created above). The file will look similar to this:
<?xml version="1.0" encoding="utf-8"?>
<menu xmlns:app="http://schemas.android.com/apk/res-auto"
    xmlns:android="http://schemas.android.com/apk/res/android">

    <item
        android:id="@+id/menu_red"
        android:title="@string/red_option" />
    <item
        android:id="@+id/menu_green"
        android:title="@string/green_option"/>
    <item
        android:id="@+id/menu_blue"
        android:title="@string/blue_option"/>
    <item
        android:id="@+id/menu_clear"
        android:title="@string/clear_option" />
</menu>
Set an ImageView
See the Tek Eye article Displaying a Bitmap in Android to add an ImageView to the app. The clown graphic used here is in the Zipped Simple Clown graphic resources to be added to the res folder.

Tell Android a View Has a Context Menu
This is easy, one line of code calling the Activity’s registerForContextMenu method, passing in the View that needs the menu. Many Views can use the same context menu or different context menus, which menu to use is determined when it is requested to be created. Place this line of code at the bottom of the onCreate method in the MainActivity.java, if your ImageView has a different id change it appropriately :
registerForContextMenu((ImageView) findViewById(R.id.imageView));Show the Context Menu When Requested
The Activity handling the View that needs the context menu uses onCreateContextMenu. The View id (using the method getId) can be tested if it is needed to display different context menus. Here just the one is being used, notice how the call to inflate takes the name of the menu file:
public void onCreateContextMenu(ContextMenu menu, View v, ContextMenu.ContextMenuInfo menuInfo){
    getMenuInflater().inflate(R.menu.color_menu, menu);
}
Act on the Selected Item
For onContextItemSelected the menu item selected is passed in, this is tested to perform the correct action:
public boolean onContextItemSelected(MenuItem item) {
    ImageView imgv=(ImageView) findViewById(R.id.imageView);
    switch (item.getItemId()) {
        case R.id.menu_red:
            imgv.setColorFilter(Color.RED, PorterDuff.Mode.LIGHTEN);
            return true;
        case R.id.menu_blue:
            imgv.setColorFilter(Color.BLUE, PorterDuff.Mode.LIGHTEN);
            return true;
        case R.id.menu_green:
            imgv.setColorFilter(Color.GREEN, PorterDuff.Mode.LIGHTEN);
            return true;
        case R.id.menu_clear:
            imgv.setColorFilter(null);
            return true;
        default:
            return super.onContextItemSelected(item);
    }
}
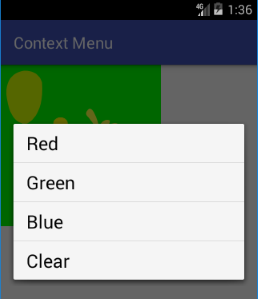
True is returned when the menu has been correctly handled. Now when you hold down on the image a menu appears and you can select an option to apply a simple filter:

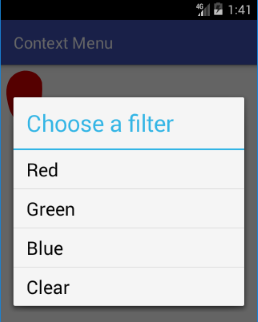
Adding a title to the menu is straightforward. Before the menu is inflated call the setHeaderTitle method:
public void onCreateContextMenu(ContextMenu menu, View v, ContextMenu.ContextMenuInfo menuInfo){
    menu.setHeaderTitle("Choose a filter");
    getMenuInflater().inflate(R.menu.color_menu, menu);
}
(The setHeaderTitle method has a version that supports getting the string from a resource file.)

Full Java Code for the ContextMenu Demo
Here is the full class code used:
package com.example.contextmenu;

import android.graphics.Color;
import android.graphics.PorterDuff;
import android.support.v7.app.AppCompatActivity;
import android.os.Bundle;
import android.view.ContextMenu;
import android.view.MenuItem;
import android.view.View;
import android.widget.ImageView;

public class MainActivity extends AppCompatActivity {

    @Override
    protected void onCreate(Bundle savedInstanceState) {
        super.onCreate(savedInstanceState);
        setContentView(R.layout.activity_main);
        registerForContextMenu((ImageView) findViewById(R.id.imageView));
    }

    public void onCreateContextMenu(ContextMenu menu, View v, ContextMenu.ContextMenuInfo menuInfo){
        menu.setHeaderTitle("Choose a filter");
        getMenuInflater().inflate(R.menu.color_menu, menu);
    }

    public boolean onContextItemSelected(MenuItem item) {
        ImageView imgv=(ImageView) findViewById(R.id.imageView);
        switch (item.getItemId()) {
            case R.id.menu_red:
                imgv.setColorFilter(Color.RED, PorterDuff.Mode.LIGHTEN);
                return true;
            case R.id.menu_blue:
                imgv.setColorFilter(Color.BLUE, PorterDuff.Mode.LIGHTEN);
                return true;
            case R.id.menu_green:
                imgv.setColorFilter(Color.GREEN, PorterDuff.Mode.LIGHTEN);
                return true;
            case R.id.menu_clear:
                imgv.setColorFilter(null);
                return true;
            default:
                return super.onContextItemSelected(item);
        }
    }
}
See Also
- Download the code for this example, available in context-menu.zip
- Android Example Projects
- Free Launcher Icons, Menu Icons and Android Graphics
Archived Comments
Pawan on May 6, 2013 at 11:33 am said: Very nice tutorial.
Author:Daniel S. Fowler Published: Updated:


